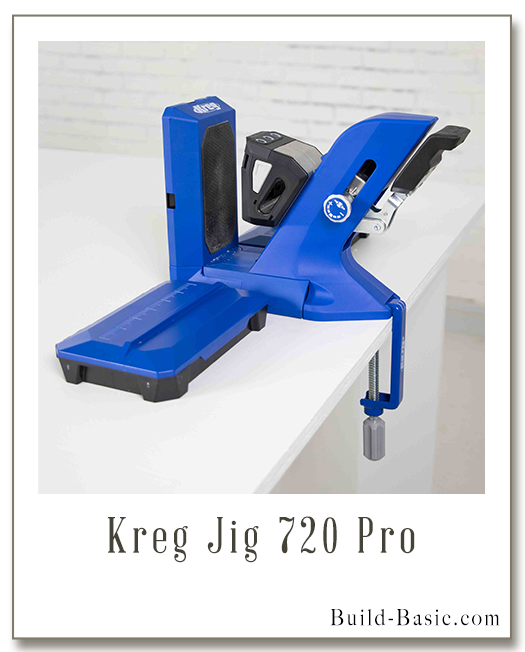
How to Use Kreg’s
Pocket Hole Jig 720 PRO
Note: This post is sponsored by Kreg, but all opinions are 100% my own.
A pocket hole jig was one of the first tools I purchased when I started building my own furniture projects. Of course, at the time, it was just a mini I grabbed at the home center, but it was enough to open my eyes to the versatility and strength pocket hole joinery could add to my builds. Since they, I’ve tried almost every Kreg model and include pocket hole joinery into almost all of my builds.
Now, with today’s release of Kreg’s newest models, the 520 and 720, they’ve automated many of the settings on the jig to make them even easier to adjust between material thicknesses and from small boards to large panels. Click the video below to see the 720 Pro in action or click over to Kreg’s Website to learn more about their newest tools and to see their library of free project and building plans.

Video Transcript:
Hi I’m Jenn from Build Basic, and today I’m showing how to use Kreg’s Pocket Hole Jig 720 PRO.
Out of the box it includes the pocket hole jig, an easy-set drill bit, two driver bits, a jig clamp, the docking station, a dust collection attachment, and pocket hole screws.
To get started using this jig, first decide if you want to set the jig upright or lay it flat. I like using it upright for short boards and flat for working along edges of plywood.
Which way you position the jig also helps position the docking station that comes with the 720 pro. If you’re using your jig upright, the docking station has two connection adaptors that snap into the underside of the jig. From there you can lock the wings onto either side to support your material. If you’re working with the jig rotated flat, the docking station’s wings can set separate from the jig to support a larger panel at the proper height to match the jig.
Let’s start the with jig upright with docking station wings mounted on either side. First secure the jig to your work surface with the provided jig clamp.
Next place the board against the grippers, and then tighten the Automaxx clamp. This automatically adjusts to any material thickness from ½-inch to 1½-inches and sets the drill guides at the proper height. It also has an adjustment knob to adjust to more or less clamping pressure.
If you’ve worked with other Kreg Jigs, you know you typically have to manually set the position of the drill guides according to the thickness of the wood, so this single step on the 720 pro can be a huge time-saver.
Next I’ll set the collar on my drill bit to the thickness of the wood. The new Easy Set Drill Bit has common material thickness markings on the bit that make it very easy to position the collar. And if you need to fine tune to another thickness, you can also use the guide on the bottom of the jig. Next use the provided tool to double check the material thickness and then tighten the collar.
Now that we’re all set up, I’m going to mount the dust collection attachment which comes included with the 720 Pro. It can mount from either side and clears the chips as you drill to help your bit drill faster and to keep your worktable clean.
And if you’re repeating pocket holes in a specific location, you can also set the adjustable stop on the docking station.
If you’re working along the edge of a large panel, support the material with the docking station’s wings, rotate the jig, and then slide against the panel before clamping it in place and drilling the pocket hole.
There are also a few accessories you can purchase separately for the 720 jig like the micro pocket hole guide and drill bit which works great on thinner materials and clicks right into place on the jig, or the custom plug cutter which also clicks right into place and can turn your offcuts into perfectly matching plugs for your work.
When your project is complete, store bits on the jig and other accessories in the flaps of the docking station, and then fold the wings of the docking station up against the sides of the jig, securing them with the swing arms.
I hope you found this information helpful. For more tool tutorials and easy woodworking projects visit build-basic.com. I’m Jenn Largesse, thanks for watching and I’ll see you next time.
MORE BUILDING PLANS