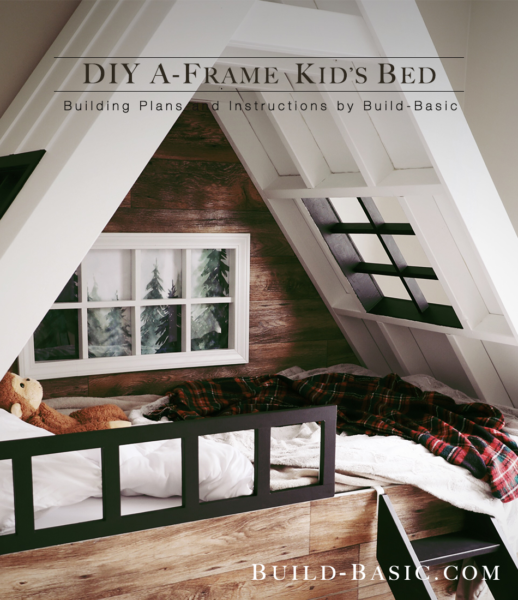
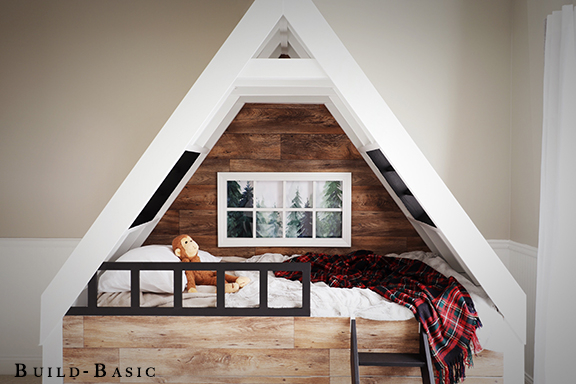
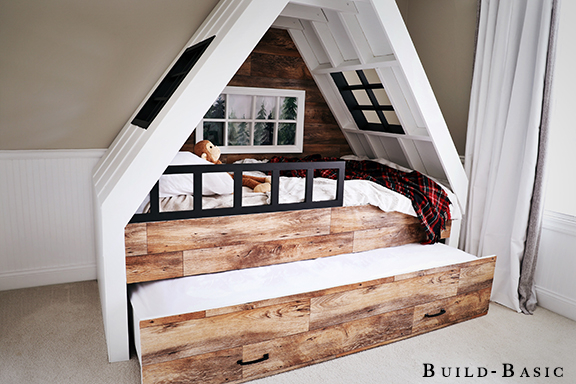
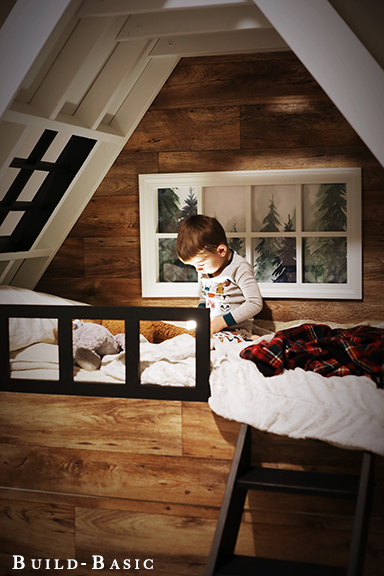
I’m pregnant with our second little boy and caught the nesting bug to build a bed for my older son as we transition him his “big boy room”. I saw a photo of an A-frame loft at Camp Wandawega in Wisconsin and got inspired to turn it into bed design. I went through a lot of variations of this bed to get the design just right, but to also make it easy to assemble (and disassemble) should we move. The completed bed consists of 7 parts; the top bed, the optional trundle bed, the two side walls, two roof pieces, and a back wall. There are also optional add-ons like the railing and steps.
The overall bed is 91” tall-by-90½” wide and sized to fit a twin XL mattress (which is 38” W x 80” L). The steps below and the video show how the pieces come together, but the building plans will further explain the details you really need to purchase and prep materials and build the bed.
Click the link below to purchase the full building plans which include the tools, materials, cut list, step-by-step instructions with images and diagrams and a board planning guide.
Cost: $550 Time: 8 Work Days Difficulty: Moderate. The assembly is straightforward but the cuts for the roof angles and the shear size of the pieces make this a moderate-level project.
Note: This list may contain affiliate links. Full Tools list (including drill bits) in the
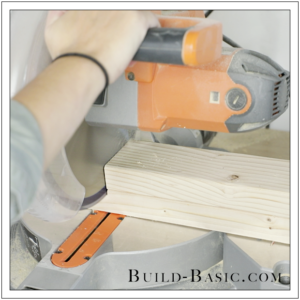
Using the cut list in my downloadable plans (coming soon), cut the 2×4 framing and plywood to size using a miter saw and a circular saw (or table saw).
2. Assemble the 2 x 4 Walls
Using wood glue and screws, assemble the two side walls to hold the upper bed.
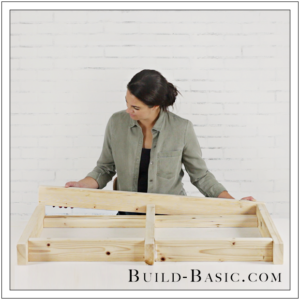
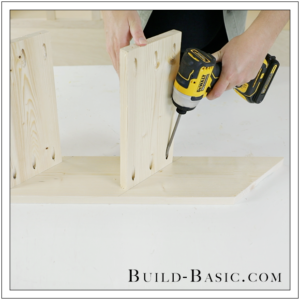
3. Assemble the Beds
Prep the plywood bed pieces with pocket holes, and then glue and clamp the sides of the beds around each base. Secure the pieces with pocket hole screws. Attach 6 caster wheels to the trundle bed to allow it roll under the top bed.
4. Attach the Top Bed to the Side Walls
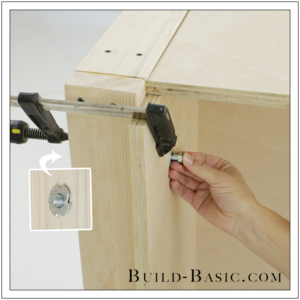
Clamp the top bed between the side walls. Drill pilot holes and then drive hex head bolts fitted with a washer through the bed and into the side walls. Hammer a tee nut into the opposite side of the pilot hole. Tighten each bolt through the hole and into the tee nut until the tee-nut tightens against the framing to create a strong (yet removable) connection.
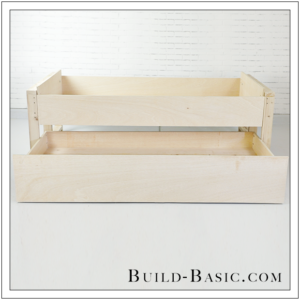
5. Dry-fit the Bottom Bed Under Top Bed
Roll the bottom bed under the top bed to check its fit. Remove and set aside for the remainder of the build.
6. Cut the 2 x 4 Roof Angles
To cut the top angle of the 2×4 roof framing at 53-degrees, we’ll create a jig (since most miter saws only cut up to 50-degrees). To create the jig, first cut a scrap 2×4 board to 45-degrees, and then it clamp in to the saw. (Note: my saw didn’t have an easy way to clamp it in place, so I attached a second vertical piece to my scrap block and then clamped it to the back fence of my saw). Set the saw to 8-degrees. Place the end of the 2×4 to be cut on the saw against the scrap block as shown. Now cut the angle. Cut the end of eight 2×4’s to this angle before removing the jig.
Next measure and mark the length of the four outside frame pieces, and then cut their other end at an opposing 37-degree angle. measure and cut the remaining pieces to create the inside vertical framing pieces.
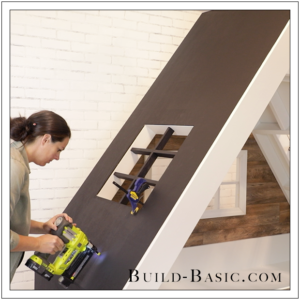
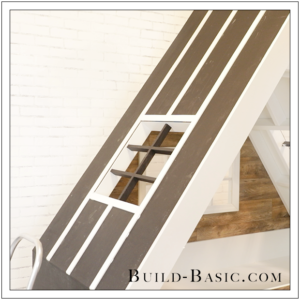
7. Assemble the Windows
Cut the 2×4 and 1×2 window frame pieces to size. Assemble the pieces using wood glue, pocket hole screws (to attach the window framing to the center rail), wood screws (to secure the 2×4 framing), and finish nails (to attach the 2×4 window frame to the 2×4 framing). Repeat to assemble the second window.
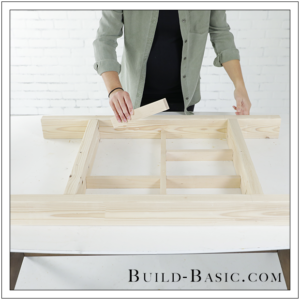
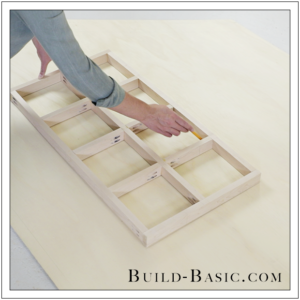
8. Build the Roof Framing
On a flat surface, lay out the roof framing. Attach the vertical pieces to the assembled window. Connect a 2×4 bottom plate and 1×6 top plate to the mitered ends of the framing to create a connection point for the side walls and peak. Repeat to assemble the second roof panel.
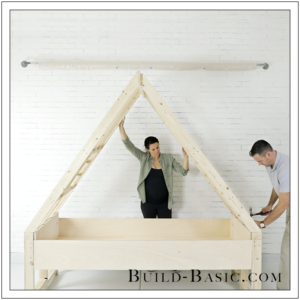
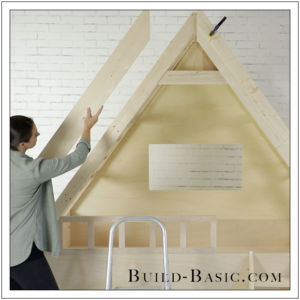
9. Raise the A-Frame Roof
(Note: If you’re working alone, this step requires the help of a friend.) Tilt one side of the roof onto the side wall of the bed, clamping the bottom plate to the top 2×4 on the side wall, flush with its front edge. Tilt the second roof panel into place on the opposite side wall, and clamp it in place. Clamp the two top plates together at the peak of the roof. Connect the base plates to each of the side walls using two hex head bolts fitted with washers and tee nuts. Connect the top plate at the peak of the roof using two carriage bolts and locking nuts.
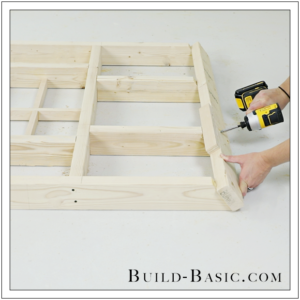
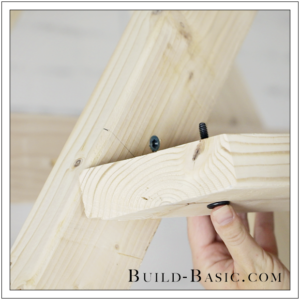
10. Install the Trusses
Using a miter saw, cut the trusses to size with opposing 37-degree miters. Clamp the longer trusses in front the framing (except the front truss which installs on the backside of the vertical framing). Drill through the truss and into the framing using a drill/driver fitted to the size of the connector bolts. Remove each truss and open the hole in the framing to accept an insert nut. Tighten an insert nut into the framing, and then tighten a connector bolt through the truss and into the insert nut to secure it against the framing. Sandwich the shorter trusses against the front and back trusses to pad out their thickness. Secure the doubled up trusses with wood glue and screws.
11. Size the Back Panel
Position the back panel in place, and then mark the angle along the outside of each roofline. Place a second smaller piece of plywood above it and mark the peak. Remove the panels and cut them to size with the circular saw. Assemble the back window with glue, pocket holes, and nails. Place the window centered on the back panel. Trace the inside of the window frame, and then cut the opening. Attach the back wall to the framing using insert nuts and screws.
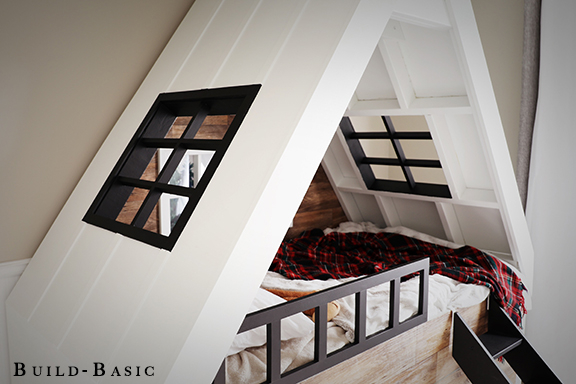
12. Assemble the Railing
Assemble the 1×2 railing using wood glue pocket screws. Fill the nail holes with wood filler, let dry, and then sand the assembly smooth. Attach two mending plates to the backside of the railing. When ready for attachment (I waited until after everything was painted), screw through the mending plates and into the inside wall of the top bed to secure the railing in place.
13. Build the Stairs
Cut the sides of the stairs at parallel 45-degree angles. Using a speed square, mark the height of each step at a 45-degree angle. Using a miter saw, cut the steps to size, and then secure them using wood glue and pocket hole screws. Attach the ladder brackets to the cut edge of each side of the stairs to allow the steps to hook on to the top bed, but remain removable when pulling out the trundle bed.
14. Attach the 1×6 Face Trim
Cut the end of the 1×6 face frame pieces to a 53-degree angle using the jig and method from step 6. Clamp the pieces to the roof line, using a scrap piece of ¼-inch ply to raise the boards above the framing and to mark a vertical line ¼-inch outside the side wall framing. Glue and nail the pieces in place. Fill all the screw and nail holes on the entire bed with wood filler, let dry, and sand smooth. Prime and paint all the parts.
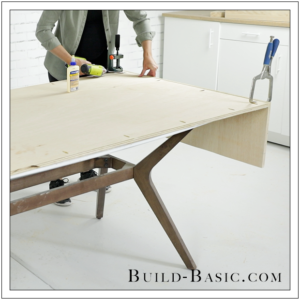
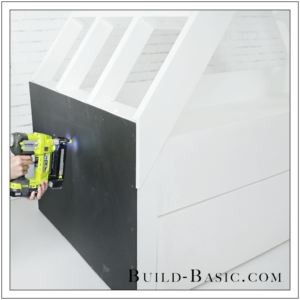
15. Install the Side Wall Panels
Using a circular saw, size the ¼-inch plywood to the side walls. Apply glue to the side wall framing. Remember not to accidentally apply glue to the bottom plate of the roof, so as to keep the pieces removable. Press the panel into place, and secure it using a pneumatic nail gun and finish nails. Repeat to size and attach the panel to the remaining side wall. (Note: I thought I was painting the roof black, so that’s why you’ll see black panels for several steps☺).
16. Secure the Vinyl Accents
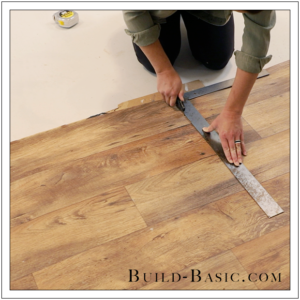
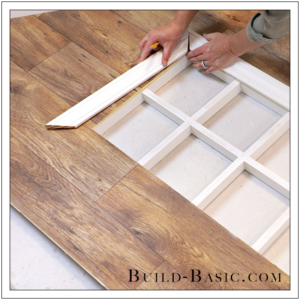
If applying sheet vinyl to the front of the beds and the back wall, cut the vinyl to size with a utility blade, using a straight edge to size the pieces for the front of the beds, and the outline of the back panels as a guide for the back wall. Apply panel adhesive to the surface according to the manufacturer’s recommendations. Press and clamp the vinyl in place, using a scrap block to smooth out any air bubbles and wrinkles.
17. Create and Install the Back Window and Trim
Sandwich the back panel between the window and mitered trim. Apply glue between the layers, and then nail through all three layers to hold the pieces in place. Reinstall the back panel. (Note: as an optional upgrade, I also screwed a thin piece of Plexiglas to the back window so I could adhere Tree Artwork to the back.
18. Cut and Assemble the Roof Panels
Clamp the roof panels in place. From the inside, mark each window opening. From the outside, mark the bottom edge of each panel along the angle of the 1×6 face trim. Using a circular saw set to the deepest bevel, trip the bottom edge of each roof panel. Set the saw back to 0-degrees and then cut out the window openings. Finish the corners of the cut with a hand saw. Apply wood glue to the roof framing. Clamp the roof panels in place. Mark the location of the framing on the panel to guide the nail placement. Shoot finish nails through the panels and into the framing to secure the roof.
19. Add the Roof Trim
Size the PVC lattice trim pieces. Apply panel adhesive to the backside of each trim piece, and then press them into place. Nail through the trim and into the framing where possible. Finish the roof with primer and paint.
I just purchased your plans. What are the names of the colors of paint you used in the build as well as type and sheen of paint? What is the name of the vinyl sheet?
We just bought our first house this year, and this bed is what my boys chose for their room. I’m actually excited to make this and can’t wait to get started!


Usbec
Love your work so much!!!
Tom
I just purchased your plans. What are the names of the colors of paint you used in the build as well as type and sheen of paint? What is the name of the vinyl sheet?
Brandi
We just bought our first house this year, and this bed is what my boys chose for their room. I’m actually excited to make this and can’t wait to get started!
Daniel
Hello, we really liked and appreciated the YouTube Cabin House Build from June 2, 2019.
We’re very interested in building the same exact house for ourselves and are curious if you’d have the plans or blueprints for it please?
Pingback: A-Frame Kids Bed With Trundle – Free Woodworking Plan.com