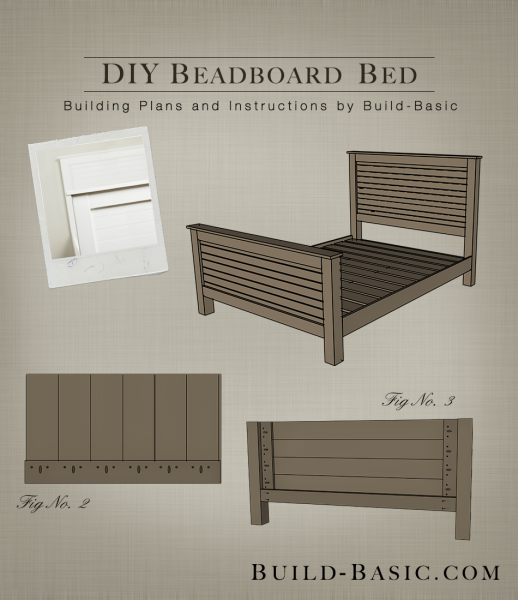
A while back I built a Twin Beadboard Bed that appeared on The Home Depot’s Blog using their 1 x 6 Tongue and Groove Patterned Boards. Here’s my Original Blog Post about the project. Since the post, an overwhelming number of you have asked for the plans to be adapted to a Queen or King size. In an effort to do both, I’ve included two cut lists below along with drawings to show how the parts come together. (Check the original post to see the building photos.) If you saw the Twin Bed tutorial, you’ll notice I added some extra support this time for the larger mattress sizes. Let me know what you think in the comments section below and, as always, touch base with questions or ideas for any future projects!!
TIP: Click the image above to reveal the free building plans. Click the tabs below to see the tools, materials and cut list.
Cost: $220
Time: 8 hours
Difficulty: Moderate. The cuts are easy, but the parts are large and, at times, require a helping set of hands to move around.
Queen Bed Cut List (*Assuming Mattress is 60″W x 80″L)
- 1 x 6 Tongue and Groove Pattern Board – 10 @ 55½ inches
- 4 x 4 Leg (Footboard) – 2 @ 29¾ inches
- 4 x 4 Leg (Headboard) – 2 @ 50¼ inches
- 1 x 3 Gusset (Footboard) – 2 @ 19¼ inches
- 1 x 3 Gusset (Headboard) – 3 @ 30½ inches
- 1 x 4 Rail – 4 @ 55½ inches
- 1 x 5 Cap – 2 @ 64½ inches
- 1 x 6 Side Rail – 2 @ 80 inches
- 2 x 4 Cleat – 2 @ 80 inches
- 2 x 4 Rails – 3 @ 55½ inches
- 2 x 4 Supports – 2 @ 80 inches
- 1 x 6 Mattress Support Slat – 10 @ 61 inches
King Bed Cut List (*Assuming Mattress is 76″W x 80″L)
- 1 x 6 Tongue and Groove Pattern Board – 10 @ 71½ inches
- 4 x 4 Leg (Footboard) – 2 @ 29¾ inches
- 4 x 4 Leg (Headboard) – 2 @ 50¼ inches
- 1 x 3 Gusset (Footboard) – 2 @ 19¼ inches
- 1 x 3 Gusset (Headboard) – 3 @ 30½ inches
- 1 x 4 Rail – 4 @ 71½ inches
- 1 x 5 Cap – 2 @ 80½ inches
- 1 x 6 Side Rail – 2 @ 80 inches
- 2 x 4 Cleat – 2 @ 80 inches
- 2 x 4 Rails – 3 @ 71½ inches
- 2 x 4 Supports – 2 @ 80 inches
- 1 x 6 Mattress Support Slat – 10 @ 77 inches
Steps
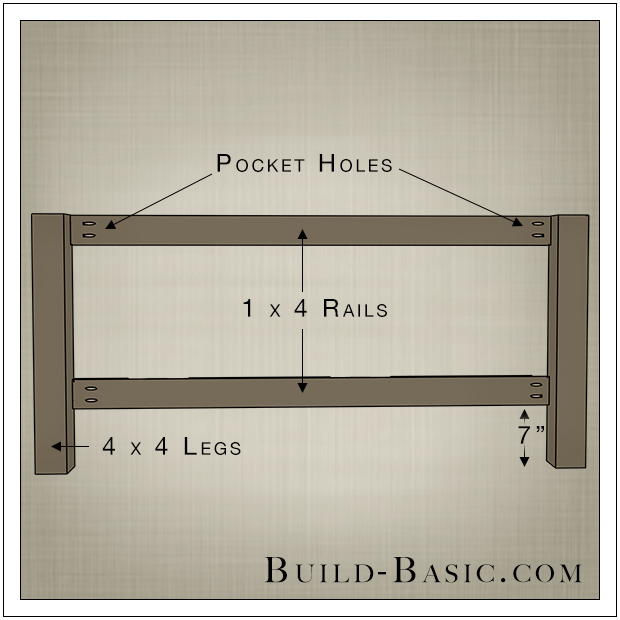
1. Assemble the Footboard Frame
Choose from the queen or king cut list above. Using a miter saw, cut the posts and boards to length. Using a pocket hole jig, drill two pocket holes at the ends of each 1 x 4 Rail. On each of the four Legs, mark a line 7 inches from its base. Place the Footboard Rails face-down between the two shorter Legs. Position the Rails so that one sets flush with the top edge of the Legs, and the other rests above the corresponding line. Apply glue to the ends of the Rails, and then attach them to the Legs using 1¼-inch pocket screws.
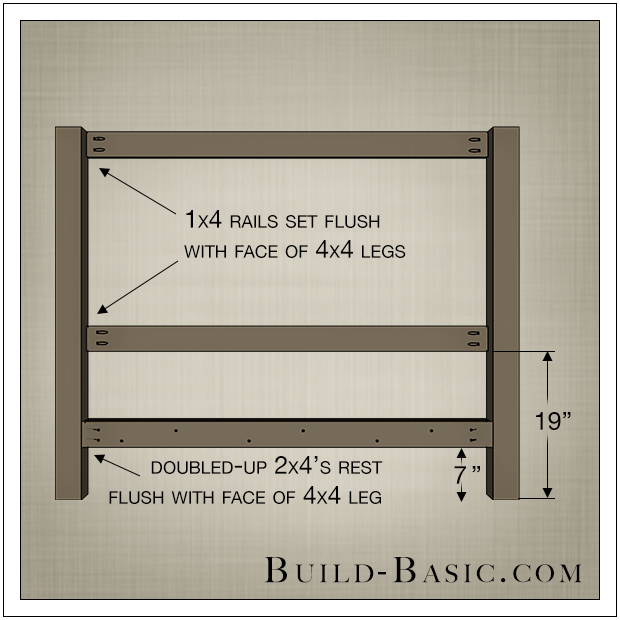
 2. Assemble the Headboard Frame
On each remaining 4×4 Legs, mark an additional line 19-inches from its base. Position the remaining Rails so that one sets flush with the top edge of the Legs, and the other rests above the line marked 19-inches from the base. Attach the Rails to the Legs using glue and pocket hole screws. Now glue and screw two 2×4 supports together using 2½-inch wood screws. Position the doubled-up 2×4’s 9-inches from the base of the Legs, flush with their inside faces. Apply wood glue to the ends of the assembled 2×4’s, and then drive 3½-inch wood screws at an angle through the 2×4’s and into the Legs.
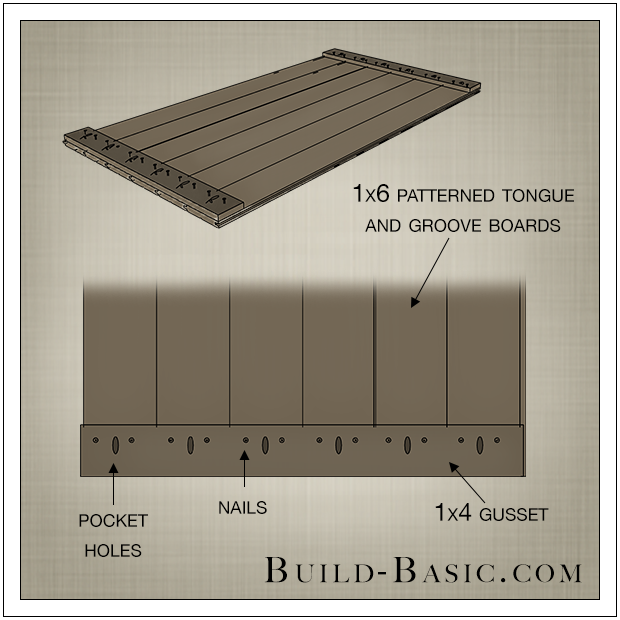
3. Create the Beadboard Panels
Fit the tongue and groove edges of four boards together to create the Footboard Panel, and six boards together to create the Headboard Panel. Cut the 1 x 4 Gusset Boards to length, and then drill pocket holes along one edge of each Gusset. Apply glue to the backside of each Gusset. Place the Gussets onto the backside of each Panel, flush with its top and side edges, so that the pocket holes face the outside edge of the Panel. You’ll notice the Footboard Gussets stop short of the base of the Panel–that is to allow space for the 2 x 4 Rail. Nail two 1¼-inch brand nails through the Gusset and into each 1 x 6 tongue-and-groove board. For added sturdiness, you can also opt to add a third Gusset in the center of the Headboard Panel.
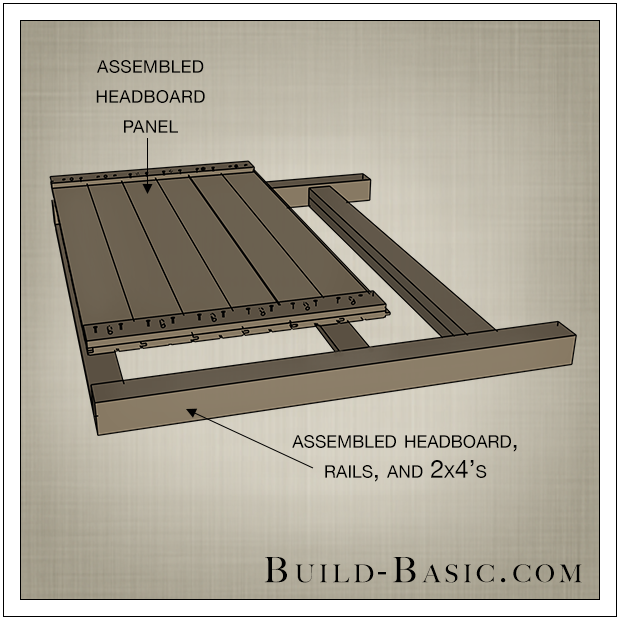
4. Attach the Panels to the Frames
Apply wood glue to the backside of the Rails and to the side edges of each assembled Panel. Place the assembled Panel face down onto the Rails, flush with the top edge of the uppermost Rail. Using a drill/driver, drive 1¼-inch pocket hole screws through the Gussets and into a Legs to hold the Panels in place.
5. Add the Footboard 2 x 4 Rail
To create a surface for the 2 x 4 Supports to mount on the Footboard, we’ll install a 2 x 4 board. To do so, apply wood glue to the ends of a 2 x 4 Rail, and then place it between the Footboard Legs, 7 inches above their base. Drive 3½-inch wood screws on an angle through the 2 x 4 and into the Legs to hold it in place.
6. Add the Caps
Apply wood glue to the top edge of each assembled Headboard and Footboard. Position a 1 x 5 Cap onto the top of each assembly so that it runs flush with the back edge of the Legs. Adjust the Cap until there is equal overhang at each end. Using a nail gun, shoot 1¼-inch nails through the Cap and into the Legs and Gussets. Fill the nail holes with wood filler, let dry, and then sand smooth.
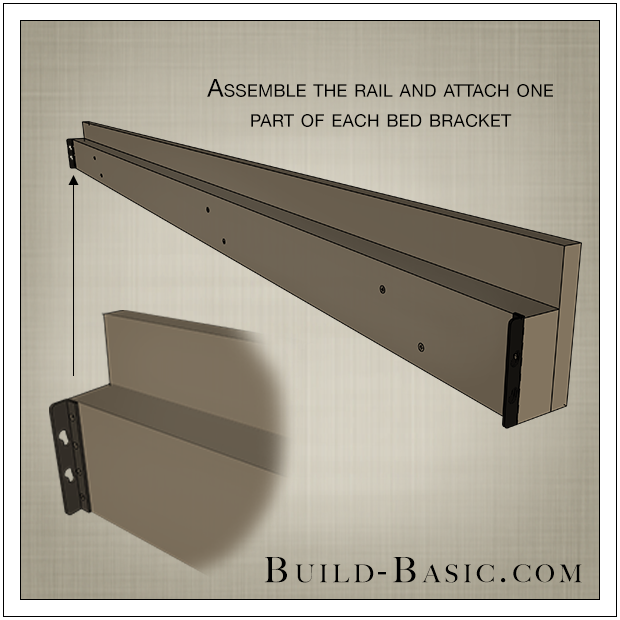
7. Create the Rails
Apply a bead of wood glue to the face of a 2 x 4 Cleat. Place the Cleat onto a 1 x 6 Side Rail, flush with its bottom edge. Flip the assembly over. Using a scrap block to steady the Rail on the Cleat, nail through the face of the Rail and into the Cleat with 1¼-inch nails to securely join the parts. Repeat to create the second Side Rail assembly. Lastly, attach one side of each Bed Frame Bracket flush with the end of each 2 x 4 Cleat as shown.
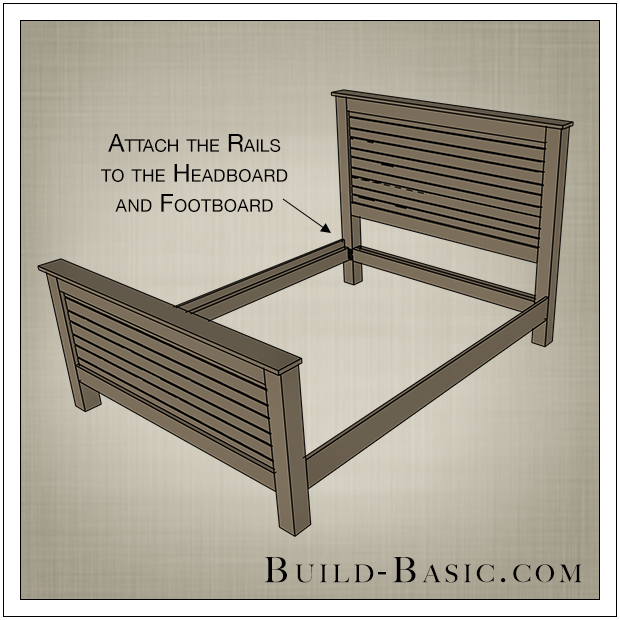
8. Attach the Rails to the Headboard and Footboard
Screw the second part of each Bed Frame Bracket to the Headboard and Footboard, measuring 2¼-inches–the thickness of the assembled Side Rails–from the outside edge of the Leg. Using a helper to hold the parts, mate the Bracket parts to attach the Rails between the Headboard and Footboard.
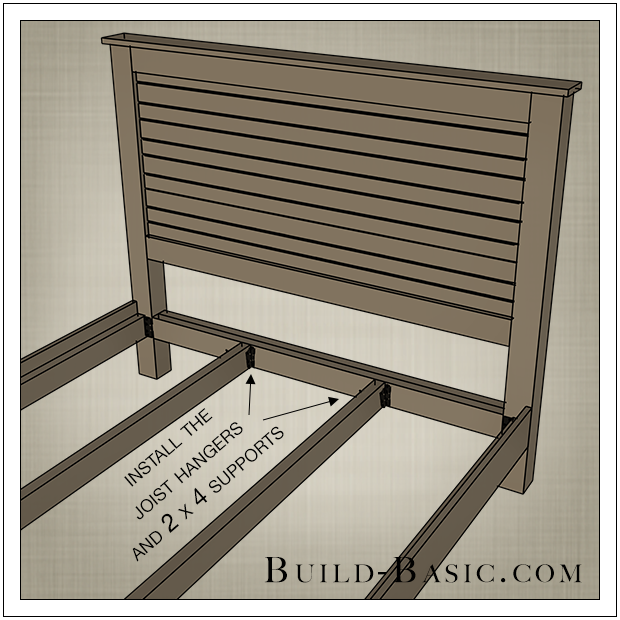
9. Install the 2 x 4 Supports
Evenly space and mount the Joist Hangers to the 2 x 4 Rails on the Headboard and Footboard. Place the 2 x 4 Supports into the Hangers.
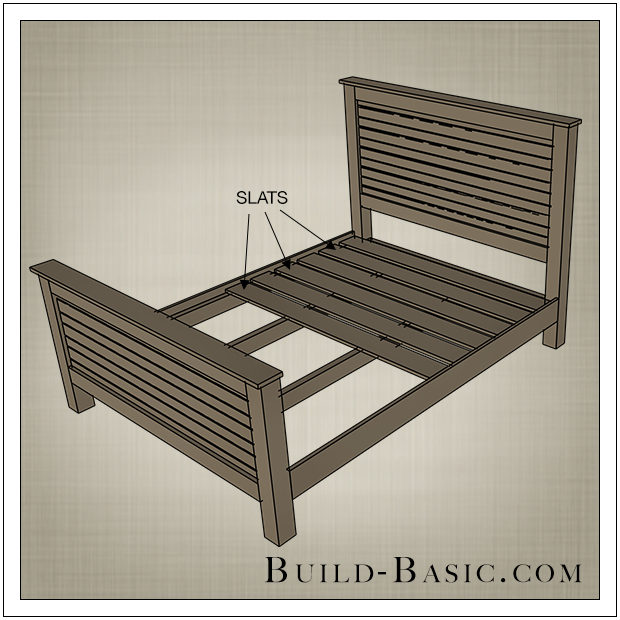
10. Place the Mattress Support Slats
Place the 1 x 6 Mattress Support Slats onto the Cleats and 2 x 4 Supports between the Side Rails. Evenly space the Slats between the Headboard and Footboard.
MORE BUILDING PLANS


John Howison
Are the 1×5 acutally 1″x5″ or are they 3/4″x41/2″ like standard lumber?
The same for 1×3 are they 3/4x 2 1/2″
Kyle
I built this last night. Thanks for the plans, they were extremely useful. Couple of comments:
1. For the Queen/ King size bed, I think it would look better with the side rails being 1 x 8s. Given the size of the bed, I think making these a little larger makes sense. We are also using 2 x 4s as the supports vs 2 x 2s in the Twin version.
2. Your supply list is a little off, need to add either 2 more 1 x 6s, or just add 2, 1 x 8s to match the above.
3. It was impossible to find a 1 x 5, so I ripped a 1 x 6, probably what most people would do I suppose. I’m a novice furniture builder!
4. I added an additional panel of the tongue and groove 1 x 6s to the back side of the
5. There are a few typos. Section 2 narrative says 9 inches, picture says 7. I think the picture is accurate.
5. It is heavy!
Thanks again.
Sue Geiszler
Do you have any plans for building a SIMPLE Murphy bed – just a simple frame – to support a Queen Mattress? It would definitely be appreciated. Thanks much