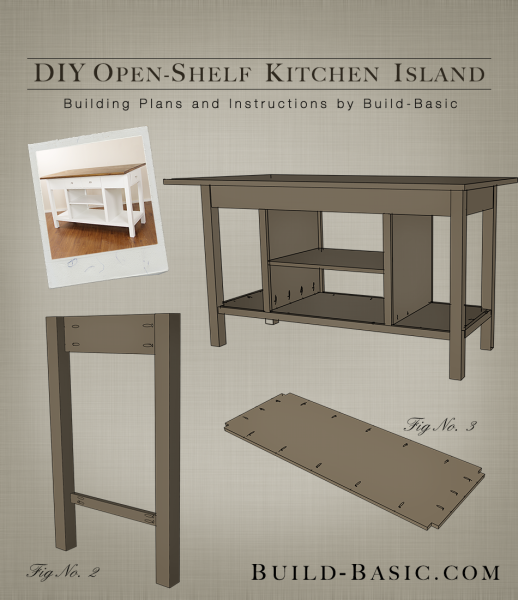
When I passed by this kitchen island at a tag sale, I couldn’t pass it up! It was a complete disaster (see the BEFORE photos in my blog post HERE), but I could see its potential. When I finally got it home and starting doing some repairs, I realized it was actually a very simple build! And so, without further ado, here’s the building plans to create your own. I’ve simplified the design a bit to not include the original doors and drawers, but they could always be added back in for additional storage space using steps from my easy tutorials HERE and HERE (Steps 14-16)! Let me know what you think in the comments section below!
TIP: Click the image above to reveal the free building plans. Click the tabs below to see the tools, materials and cut list.
Cost: $150
Time: 8 hours
Difficulty: Moderate. The cuts are easy, but the parts are large and, at times, require a helping set of hands to assemble.
Note: This list may contain affiliate links
(1) ¾” x 4′ x 8′ Plywood
(4) 2¼ x 2¼ x 36″ Table Legs
(4) 2 x 6 x 10′ Boards to make the Top
(4) 1 x 2 x 8′ Boards
1¼-inch Coarse Thread Pocket Screws
Figure 8 Top Fasteners
1¼-inch Brad Nails
5/8-inch Wood Screws to attach the Figure 8 Fasteners to the Cleats
1-inch Wood Screws to attach the Figure 8 Fasteners to the Tabletop
Wood glue
2¼ x 2¼ Leg – 4 @ 35½ inches
¾” Plywood Apron – 2 @ 53 5/8″W x 5″H
¾” Plywood Apron – 2 @ 17½”W x 5″H
¾” Plywood Wall – 2 @ 17½” D x 25¾”H
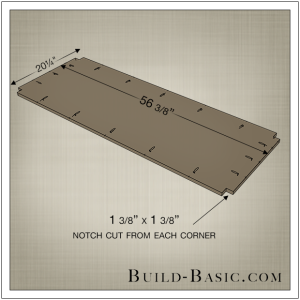
¾” Plywood Base – 1 @ 56 3/8″W x 20¼”D
1 x 2 Crosspiece – 2 @ 53 5/8 inches
1 x 2 Crosspiece – 2 @ 17½ inches
1 x 2 Cleat – 2 @ 17½ inches
1 x 2 Cleat – 2 @ 20¼ inches
1 x 2 Stile – 4 @ 21½ inches
2 x 6 Tabletop – 6 @ 49 inches
2 x 6 Tabletop – 2 @ 33 inches
Steps
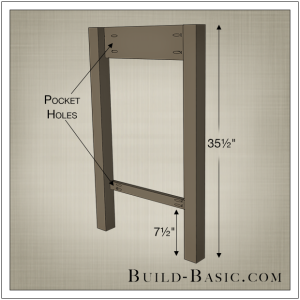
1. Assemble the Sides
Using the cut list above, cut the parts to size. Using a pocket hole jig, drill pocket holes at the ends of each Cleat, Apron and Crosspiece. Position a short Apron and Crosspiece between two Legs. Position the Apron flush with the top edge of the Legs, and the Crosspiece 7½ inches from the base of the Leg. Apply glue to the ends of the Apron and Crosspiece, and then clamp between the Legs, recessed 1/8-inch from the face of the Legs. Using a drill/driver and 1¼-inch pocket hole screws, attach the Apron and Crosspiece to the Legs. Repeat to assemble the second Side.

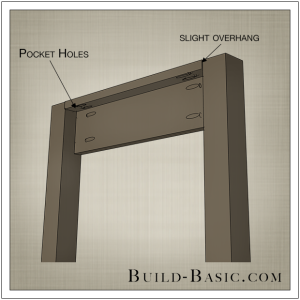
2. Attach a Cleat
Apply wood glue to the ends of one of the shortest 1 x 2 Cleats. Place the Cleat between the Legs, flush with their top edges, and with the pocket holes facing downward. Using a drill/driver and 1¼-inch pocket hole screws, attach the Cleat to the Legs. Repeat to attach a Cleat to the second Side.

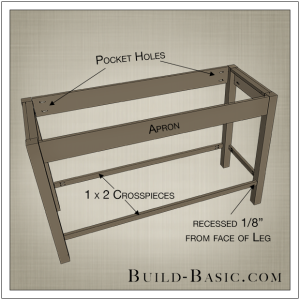
3. Connect the Sides
Position the long Apron and Crosspieces between the assembled Sides so that the Apron pieces set flush with the top edge of each Leg, and the Crosspieces set 7½ inches from the base of each Leg. Apply wood glue to the ends of the Apron pieces and Crosspieces, and then clamp them to the Legs, recessed 1/8-inch from the face of each Leg. Using a drill/driver and 1¼-inch pocket hole screws, attach the Apron pieces and Crosspieces to the Legs to join the Sides.

4. Insert the Cleats
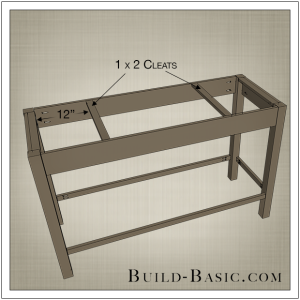
On the inside face of each long Apron piece, mark a line 12 inches from each end. Apply wood glue to the ends of the remaining 1 x 2 Cleats. Place the Cleats between the long Apron pieces, inside the lines. Clamp the Cleats in place, and then attach them to the Apron pieces using 1¼-inch pocket hole screws.

5. Prep the Base
Using a circular saw or table saw, cut the ¾-inch plywood Base to size. Mark a 1 3/8″ x 1 3/8″ notch from each corner. Using a jigsaw, cut the notches so that the Base can set between the Legs. Lastly, using a pocket hole jig, drill pocket holes along each edge of the underside of the Base about every 5 inches.

6. Add the Base
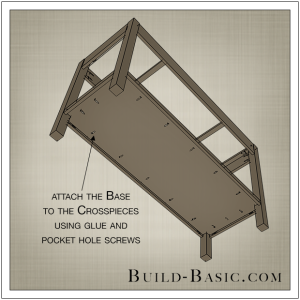
Apply glue to the edges of the Base. Place the Base into the assembly, flush with the top edge of each 1 x 2 Crosspiece, and with its pocket holes facing downward. Clamp the Base in place. Using a drill/driver and 1¼-inch pocket hole screws, attach the Base to the Crosspieces.

7. Prep the Walls
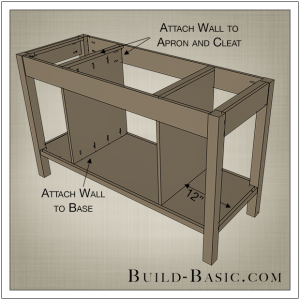
Using a circular saw or table saw, cut the ¾-inch plywood Walls to size. Make a mark 5 inches from the top of each Wall along its edges. Using a pocket hole jig, drill two pocket holes along each edge above the mark so that the Wall can be attached to the Apron pieces. Finish prepping the Walls by drilling 3 pocket holes along the top edge, and 4 pocket holes along the bottom edge of each Wall.

8. Install the Walls
Mark lines on the surface of the Base that run 12 inches from each end of the plywood. Apply wood glue to the top and bottom edges of a Wall. Position the Wall inside the assembly with the pocket holes facing inward. Align the bottom edge of the Wall inside the line marked on the Base, and the top edge of the Wall with the outside edge of the corresponding Cleat above. Drive 1¼-inch pocket hole screws through the Wall and into the Base, Cleat and Apron pieces to hole the Wall in place. Repeat to install the remaining Wall. Fill the lower pocket holes with wood filler or plugs, let dry, and then sand smooth.

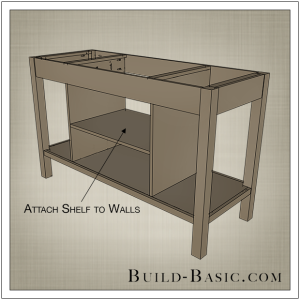
9. Add the Shelf
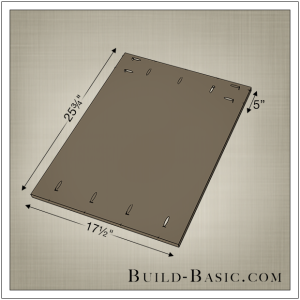
Cut the Shelf to size, and then drill pocket holes along its ends. Finish the front edge of the Shelf with Edge Banding (See my easy tutorial
HERE). Mark a line on the inside face of each Wall that’s 10 inches from its bottom edge. Apply wood glue to the ends of the Shelf. Position it above the lines, and then clamp in into place. Drive 1¼-inch pocket hole screws through the ends of the Shelf and into the Walls to hold the Shelf in place. Note you can also use a Pin Hole Jig like this (Affiliate Link)
Kreg Jig Shelf Pin Jig to make the Shelf adjustable.

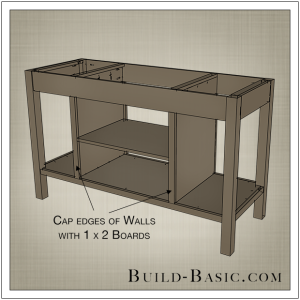
10. Finish the Edges of the Walls
Finish the front and back edge of each Wall by capping it with a vertical 1 x 2. Position each 1 x 2 board onto the edge of the plywood so that the edge of the board runs flush with the outer face of the Wall. Nail the boards in place using a pneumatic nail gun and 1¼-inch brad nails.

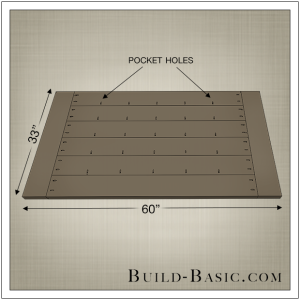
11. Assemble the Island Top
Cut the 2 x 6 board to size. Drill pocket holes along the edges and ends of the longer boards. Apply glue to the edges of the boards, and then screw them together to create a solid surface. Butt the end boards against the assembled center boards, and then screw them into place. Sand the surface smooth.

12. Mount the Island Top
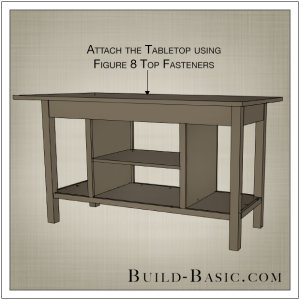
Using a drill/driver, attach Figure 8 Top Fasteners (see materials list above for link) to the surface of each Cleat. These fasteners will allow the island’s Top to expand and contract without warping. Center the island Top on the assembled base, and then screw up through the fasteners and into the underside of the Top with 1-inch wood screws.

MORE BUILDING PLANS






Mary Losch
Love this – want to build it but don’t see the drawers in the plans – only in the picture. Do you have plans that includ the drawers? Thanks.
Pingback: basic wood shelf plans – Woodworking Plans Free Download