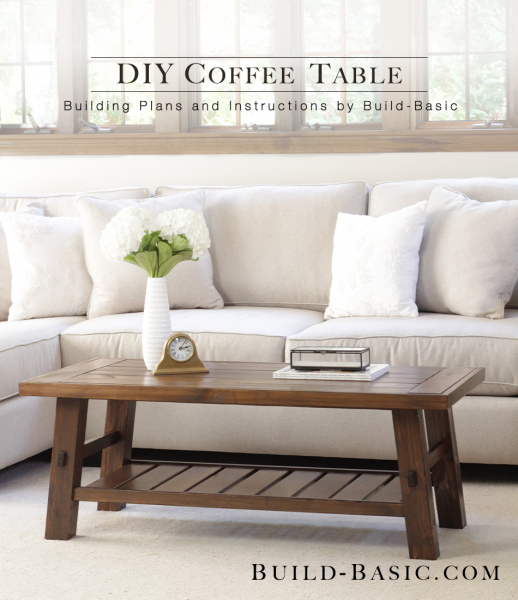
Don’t let the angles on this table scare you away–the design is actually very simple! Just adjust your miter saw from zero to seven degrees for a few of the cuts, and you can create the splayed legs on this basic coffee table. And with the addition of blocks to the front of the legs, it’s easy to fake the look of advanced mortise and tenon joinery. Read on to see how the parts come together.
TIP: Click the image above to reveal the free building plans. Click the tabs below to see the tools, materials and cut list.
Cost: $45
Time: 4 hours
Difficulty: Moderate. Joining angled pieces is easy, but requires a close eye to make sure you’re keeping the pieces oriented correctly.
Note: This list may contain affiliate links
(3) 1 x 2 x 8 Boards
(5) 1 x 4 x 8 Boards
(2) ½ x ½ x 36 inch Square Dowels
(1) 4 x 4 x 8 Post to make the Legs
(Note: I ripped the 4 x 4 post down to 2¾ x 2¾ inches with a table saw for a slimmer looking leg. As alternatives, you can use the post as is at 3½-inches-wide, or purchase pre-cut 2¾ x 2¾ x 18 inch turning blanks, though they will add about $14/leg to the project.)
(8) Figure 8 Top Fasteners
½ inch Wood Screws to attach the fasteners to the Tabletop
1 inch Wood Screws to attach the fasteners to the Apron
1¼ inch Pocket Hole Screws
1¼ inch Finish Nails
¾ inch Finish Nails
Wood Glue
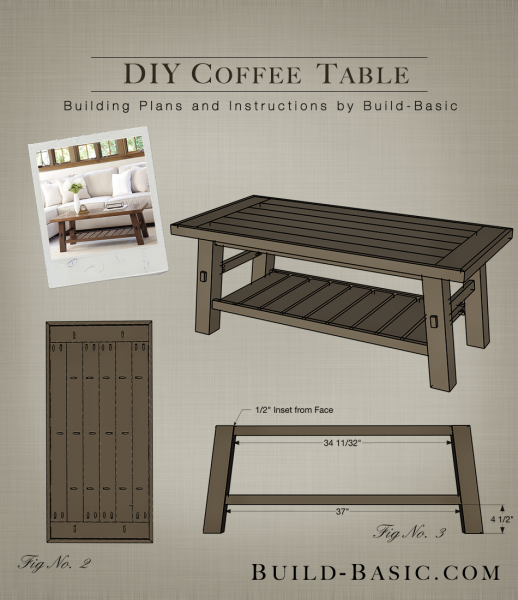
Table Top
- 1 x 4 Boards – 6 @ 38½ inches
- 1 x 4 Boards – 2 @ 21 inches
- 1 x 2 Edge Trim – 2 @ 47 inches (ends beveled at opposing 45-degree angles)
- 1 x 2 Edge Trim – 2 @ 22½ inches (ends beveled at opposing 45-degree angles)
Base
- 2¾ x 2¾ Legs – 4 @ 17 ¼ inches (mitered at parallel 7-degree angles)
- 1 x 2 Apron – 2 @ 34 11/32 inches (mitered at opposing 7-degree angles)
- 1 x 2 Apron – 2 @ 13 inches
- 1 x 2 Apron Crosspieces – 2 @ 16 inches
- 1 x 2 End Pieces – 2 @ 13 inches
- 1 x 2 Blocks – 4 @ ¾ inch
Shelf
- 1 x 2 Shelf Support – 2 @ 37 inches (mitered at opposing 7-degree angles)
- ½ x ½ Cleats – 2 @ 36 inches
- 1 x 4 Shelf Slats – 9 @ 16 inches
Steps
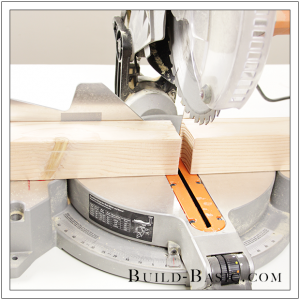
1. Cut the Parts
Using a miter saw, cut all the parts to size except the 1 x 2 Trim for the Tabletop. If you’re ripping the 4 x 4 posts to make the legs slimmer like I did, use a table saw to cut two adjacent sides of the post down to 2¾-inches-wide.

2. Drill the Pocket Holes
Drill two pocket holes at each end of the 1 x 2 Apron Crosspieces, shorter 1 x 2 Apron pieces, and the 1 x 2 Base End Pieces.
3. Position the Pocket Holes
Drill pocket holes into the two remaining Apron Pieces and the 1 x 2 Shelf Supports. Because the ends of these pieces are mitered at an angle, be sure to align each board so that the pocket holes fit on its width.
4. Mark the Legs
Set all the legs sides-by-side so that their mitered ends are all oriented the same way. Measuring from short edge of the angled base, mark the height of the Shelf at 4½ inches.
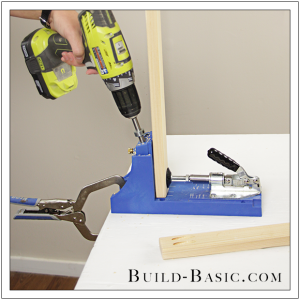
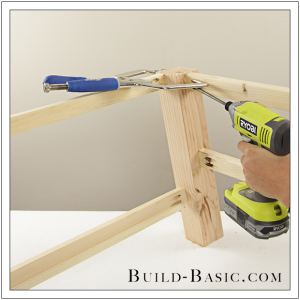
5. Attach the First Pieces
Looking at the back-right Leg, lay a ½ x ½ dowel along the Leg to act as a spacer. Now place the ends of the Shelf Support and Apron against the Leg as shown. Apply glue to the end of each board, clamp it in place, and then attach it using a drill/driver and 1¼ inch pocket hole screws. Attach the opposite end of each board to the adjoining Leg. Repeat to join the Front Legs with the front Shelf Support and Apron Boards.
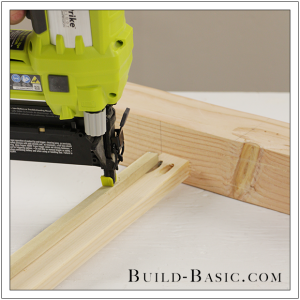
6. Attach the Cleats
Place the ½ x ½ inch Cleat onto the backside of each Shelf Support, flush with its bottom edge. Apply glue to the Cleat, and then secure it in place using a pneumatic nail gun and ¾ inch finish nails placed every 6 inches.
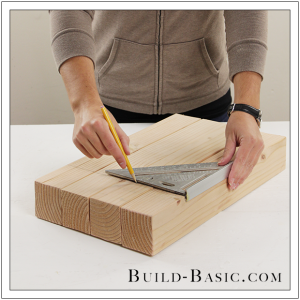
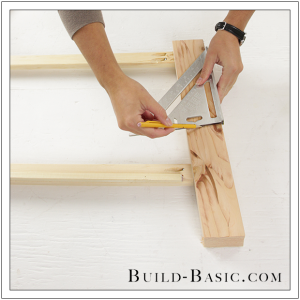
7. Mark the Height of the End Pieces
On the inside face of each Leg, make a mark 7 inches from the top edge of the Leg. Using a speed square, mark the line perpendicular to the edge of the leg. Additionally, mark the center of the line on each Leg.
8. Install the End Pieces
Apply glue to the ends of the 1 x 2 End Pieces for the Base and Apron, and then clamp them in place against the inside of the Leg. Position the pieces so that one runs flush with the top edge, and the other sets below the line marked in Step 7. Center both pieces on the leg, and tilt them so that they run parallel to the edge of the Leg. Using a drill/driver and 1¼-inch pocket holes screws, attach the pieces to the Leg. Repeat on the opposite end.
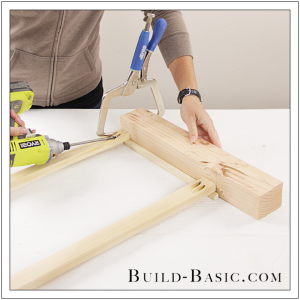
9. Assemble the Front and Back
Apply wood glue to the End Pieces, and then, one by one, clamp them to the remaining Legs. Join all the parts using 1¼ inch pocket hole screws.
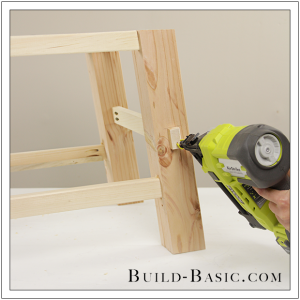
10. Attach the Blocks
To create the illusion that the Base’s End pieces run through the legs like tenons, center and nail the Blocks to the outside face of each Leg, level with the End Piece using 1¼-inch finish nails. Remember to tilt the Block to follow the angled edge of the Leg.
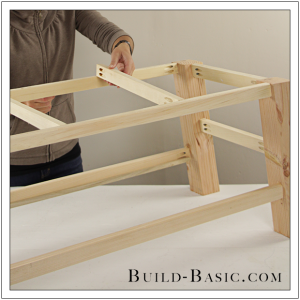
11. Insert the Apron Crosspieces
To sturdy to Tabletop, install the Apron Crosspieces between the front and back Apron Boards using a wood glue and 1¼-inch pocket hole screws.
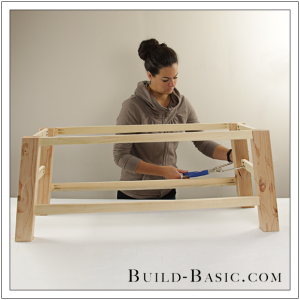
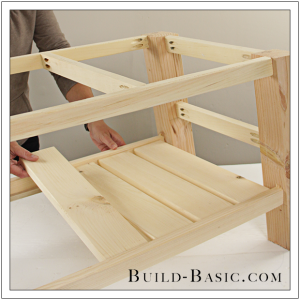
12. Add the Shelf Slats
Apply wood glue to the top of each ½ x ½ inch Cleat. Place the Shelf Slats onto the Cleats with ½-inch spacing between them.
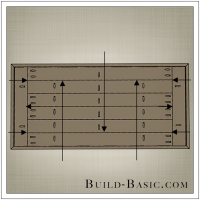
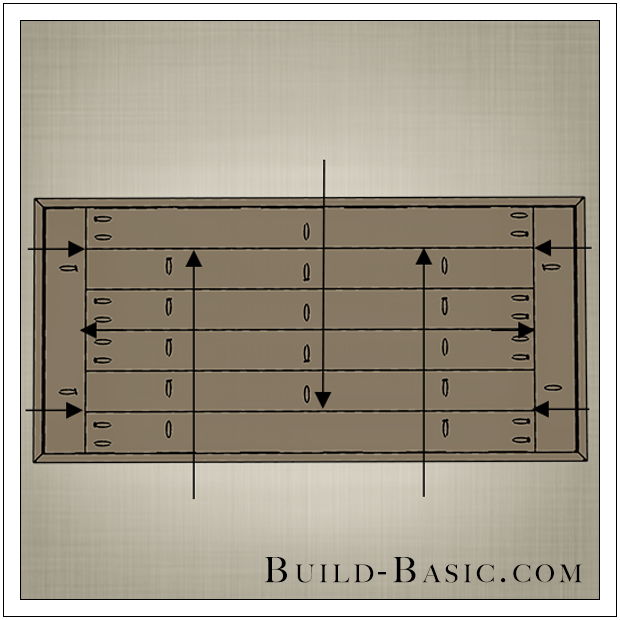
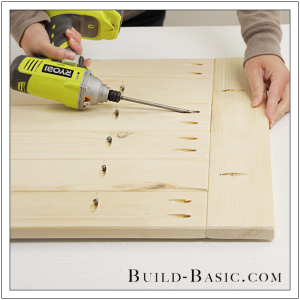
13. Assemble the Tabletop
Using a pocket hole jig, drill pocket holes into the edges and ends of the underside of the tabletop boards according to the diagram below. Apply wood glue to the edges and ends where the boards touch. Using a drill/driver and 1¼-inch pocket hole screws, assemble the Tabletop Boards.
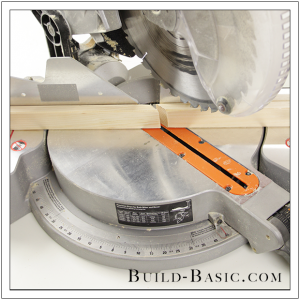
14. Cut the Tabletop Trim
Place the 1 x 2 boards alongside the assembled Tabletop to mark their length. This mark will be the start, or “short end” of the 45-degree miter cut. Now place the boards on edge on the miter saw to miter their ends at 45-degrees.
15. Install the Tabletop Trim Boards
Apply wood glue to the outer edge of the assembled Tabletop and the cut ends of the 1 x 2 Trim Boards. Place the Trim on edge around the Tabletop. Using a pneumatic nail gun and 1¼-inch finish nails, nail through the Trim and into the edges of the Tabletop to secure the Trim in place.
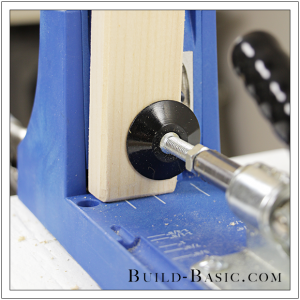
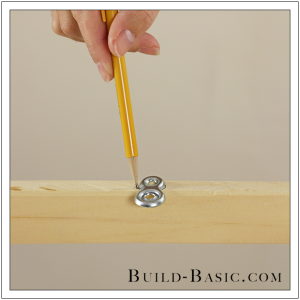
16. Mark the Tabletop Fasteners
Because the Tabletop is made form several slats of wood, I like to use Figure 8 Top Fasteners to allow the Tabletop boards to expand and contract. To install the fasteners, first mark the placement of each fastener on the apron–I placed three fasteners along each long Apron Board, and two on each End Apron Board. Outline half of the faster on the top edge of the Board.
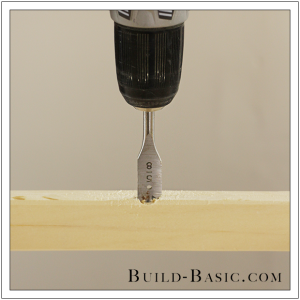
17. Inset the Fastener
To allow the fasteners to set flush with the surface of the board, drill a shallow inset using a paddle bit sized to the width of the outline marked in Step 16.
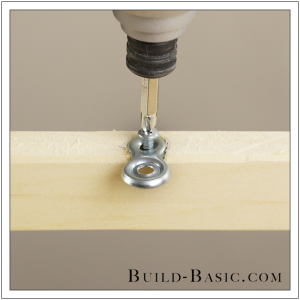
18. Attach the Fastener to the Apron
Set each fastener into the inset hole drilled in Step 17 so that its surface sets flush with the surface of the Apron Board. Using a drill/driver and 1-inch wood screws, secure the fastener to the Apron.
19. Secure the Tabletop to the Base
Place the Base upside down on the Tabletop so that there is equal overhang on all sides. Screw through each fastener and into the tabletop with ½-inch wood screws to secure the tabletop in place.
MORE BUILDING PLANS


M.S.
How do you download the plans? Nothing happens when I click the picture.