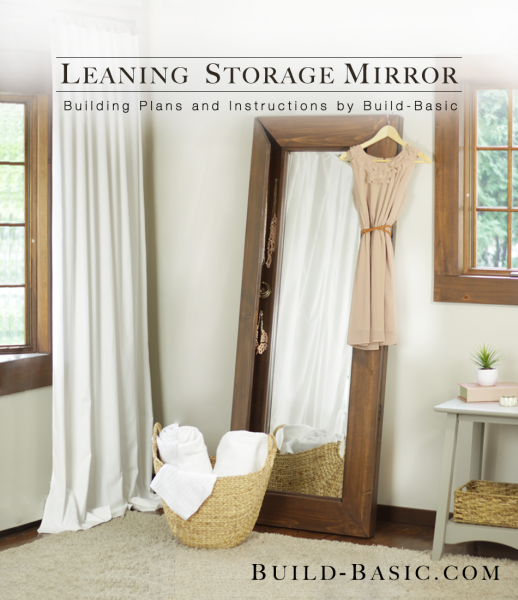
The beautiful wide frame on this full-length mirror hinges open to reveal hidden storage for jewelry in a dressing room, or for keys and the pup’s leash near an entryway. Insert hooks, shelves or Velcro to hold items in place and out of sight. The cut list is easy to adjust to any mirror size, and the materials can be swapped to create a thicker frame or a deeper storage cavity. The possibilities are wide open to fit your style and storage needs.
Stain/Polyurethane Credit: Zar oil-based wood stain in Mocha and Zar Ultra Clear Satin
Cost: $70
Time: 4 hours
Difficulty: Moderate. While the parts assembly easily, getting the mitered corners on the frame to sit tight requires an accurate cut.
(1) ¼-inch Plywood – Have a piece cut at the homecenter
(8) 1 x 2 x 6′ Boards
(3) 1 x 6 x 6′ Boards
(1) 16 x 60 inch Mirror – Like this one from Home Depot
(4) Butt Hinges
1¾-inch Finish Nails
1-inch Finish Nails
Cup Hooks
Wood Glue
Mirror Adhesive
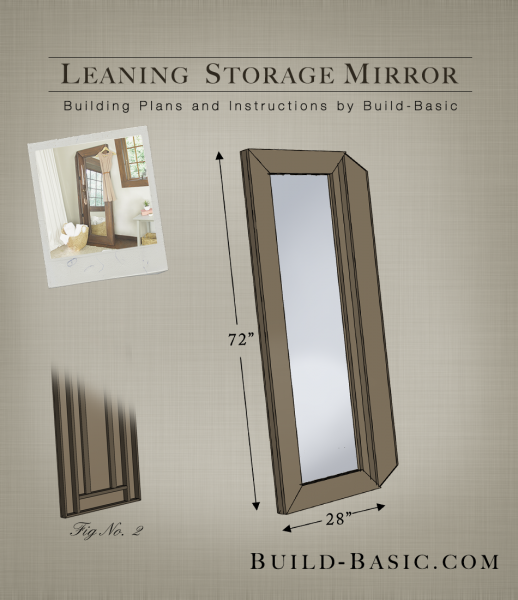
¼-inch Plywood – 1 @ 72 x 28 inches
1 x 6 Mirror Frame – 2 @ 72 inches (45-degree mitered ends)
1 x 6 Mirror Frame – 2 @ 28 inches (45-degree mitered ends)
1 x 2 board – 2 @ 72 inches (45-degree mitered ends)
1 x 2 board – 2 @ 28 inches (45-degree mitered ends)
1 x 2 board – 2 @ 70½ inches
1 x 2 board – 2 @ 16 inches
1 x 2 board – 2 @ 60 inches
Steps
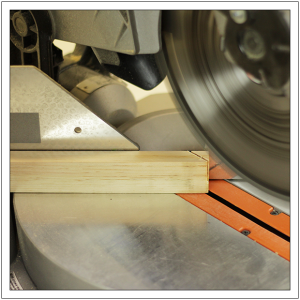
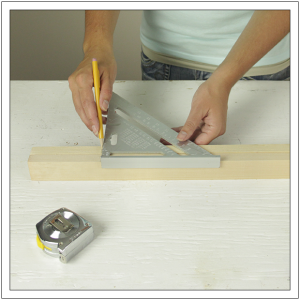
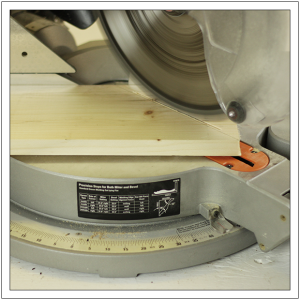
1. Cut the 1 x 2 Boards
Using a miter saw and the cut list provided, cut each 1 x 2 board to size. To create finished outside corners, miter the ends of the outer pieces. Lightly sand the cut ends of each piece to remove splinters and create clean joints. If necessary, cut the plywood to size using a circular saw.
TIP: Get straighter cuts with a circular saw using our simple DIY Cutting Fence Tutorial

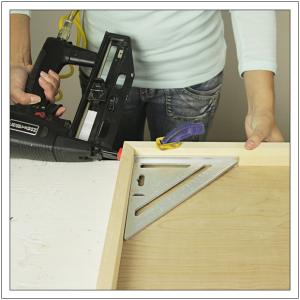
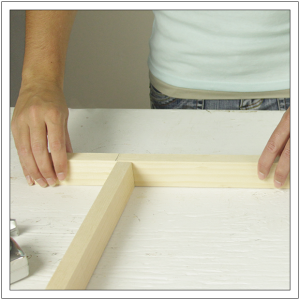
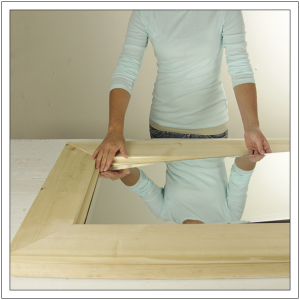
2. Assemble the Outer 1 x 2 Boards
Lay the plywood flat on the work surface to help position the boards. Place the outer 1 x 2 boards along the edges of the plywood rectangle to create square joints. Use a speed square to further adjust the joints until they are square. Apply wood glue to the mitered ends of the 1 x 2s. Using a pneumatic nail gun, tack the pieces together by shooting 1 ¾ inch finish nails through the upper and lower 1 x 2s, and into the longer side boards. While the nails may not seem like enough to hold the frame together, the assembly will hold its shape better once attached to the plywood.
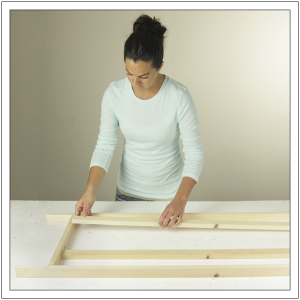
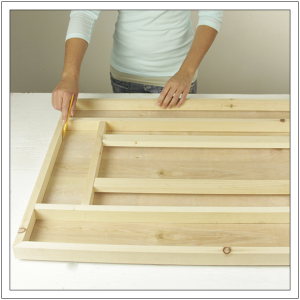
3. Mark the Inner 1 x 2 Boards
Lay the long inner 1 x 2 boards on edge side-by-side. Using a speed square, mark a line 4½ inches from each end. Lay the shorter 1 x 2 crosspieces on edge side-by-side and mark a line 3 inches from each end on both boards.
4. Layout the Inner 1 x 2 Boards
Position the 1 x 2 crosspieces on edge between the two longer 1 x 2 boards marked in step 3. Align the outer face of the crosspieces with the marked lines as shown. Apply wood glue to the ends of the crosspieces and use a pneumatic nail gun to shoot 1¾-inch nails through the longer 1 x 2s and into the ends of each crosspiece.
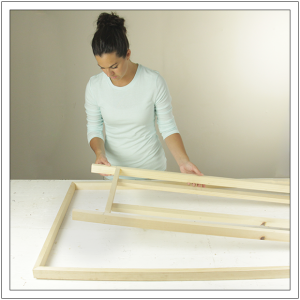
5. Add the Mirror Rests
Lay the 1 x 2 “mirror rests” flat (not on edge) between the crosspieces. Laying the rests flat creates a recessed cavity for the mirror. Align the outer edges of each 1 x 2 with the lines marked on the crosspieces. Apply wood glue to the ends of the 1 x 2 mirror rests, and then shoot 1 ¾ inch nails through the crosspieces and into the ends of the 1 x 2 rests.
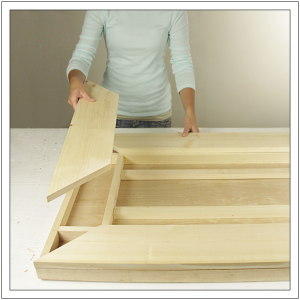
6. Join the 1 x 2 Parts
Lay the assembled 1 x 2 boards inside the outer 1 x 2 frame. Apply wood glue to the exposed ends of the inner assembly, and then use the nail gun to shoot 1¾-inch nails through top and bottom boards of the outer frame and into the inner boards. Keeping all the nail holes along the top and bottom of the outer frames makes them less noticeable and easier to conceal once filled and sanded.
7. Outline the 1 x 2 Boards
The easiest way to accurately shoot nails through the plywood backing and into all the frame pieces (except the mirror rests), is to first mark the boards on the plywood. To do this, lay the front/face of the frame against the back of the plywood. Outline the parts of the frame on the plywood using a pencil.
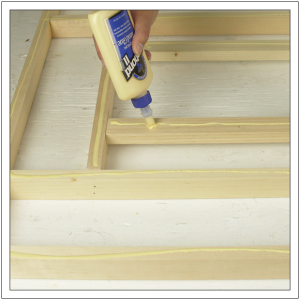
8. Apply Wood Glue
Apply a bead of wood glue to the back edge of each part of the frame. Because this project will be stained, it’s important to avoid drips of glue that could later ruin a consistent finish on the wood. Therefor, as a precaution, smooth the bead of glue with a small paintbrush or cloth to prevent it from oozing out, and wipe any excess glue away quickly with a damp rag.
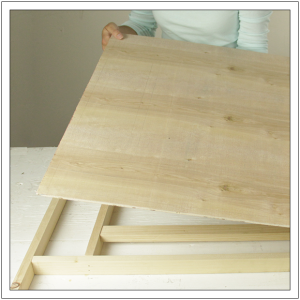
9. Position The Plywood Backing
Place the plywood face down on the frame so that its edges are flush with all sides of the assembled 1 x 2s. Lower the plywood slowly being sure not to slide it around on the glue.
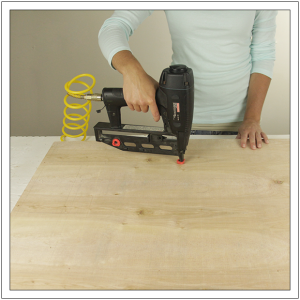
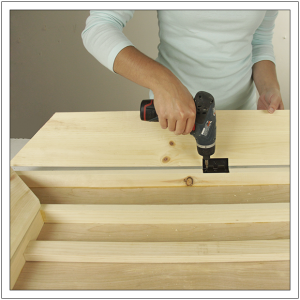
10. Secure the Plywood Backing
Using a nail gun and 1 inch finish nails, secure the plywood backing by nailing through the outlined boards on the plywood and into the 1 x 2s. Place a nail about over 8-10 inches, avoiding joints.
11. Cut the 1 x 6 Boards
Using a miter saw, cut the 1 x 6 boards to length with opposing 45-degree miter cuts at each end.
12. Position The 1×6 Boards
Lay the 1 x 6 boards in place on the assembled 1 x 2s. The boards should lay flush with the outer edge of the frame and create tight joints where their miters meet. Lightly sand each 1 x 6, and then wipe down all the parts.
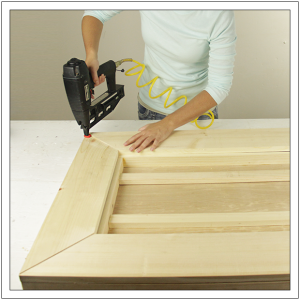
13. Attach the Top and Bottom 1 x 6s
Apply a small amount of wood glue to the edges of the 1 x 2s below the top and bottom 1 x 6s. Using a Nail gun and 1¾-inch finish nails, attach the top and bottom 1 x 6 boards to the frame by nailing through the face of each board once at each corner, and again in the center of the inner edge.
14. Add the Hinges
Lay one half of each hinge on the inside of the 1 x 6 boards along the edge. Drill a small pilot hole though each screw hole and then drive the provided screws into the holes to hold the hinges in place. Position the board alongside the frame and repeat the process to attach the hinge to the front edge of the frame as shown.
15. Install the Mirror and Hooks
Dryfit the mirror inside the frame as shown. Remove the mirror and set it aside. Fill and sand all nail holes. Apply paint or stain as desired. Using a caulk gun, apply a bead of mirror adhesive to each of the mirror rests and gently press the mirror in place. Finish by screwing hooks or small block shelves into the open cavities on each side to hold jewelry, keys and any other items you might want to tuck away in an entryway or dressing room.
MORE BUILDING PLANS


Anonymous
Nice however a better space saver on a turnabout,.
Anonymous
Please show a picture of how you set up the inside!
Theresa
Very creative project. Your pictures and directions are clear. I would be helpful to have a list of the lumber I know that the size of the mirror would make a difference. Thanks you have a lot of really great ideas
Emily, Our house now a home
This is a great way to update and customize a mirror! I recently did a mirror frame and love how it turned out. I have to say, your plans, pictures and tutorials are amazing! I am a diy and home decor blogger. I have never seen something so concise and well pictured before. So impressed!
Pingback: Dump A Day Simple Ideas That Are Borderline Crafty - 20 Pics