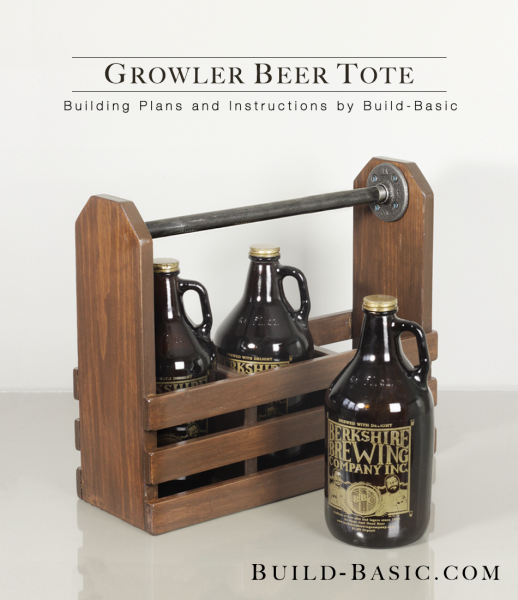
For the beer connoisseur in your life, this portable caddy is perfect for transporting handmade or locally-brewed “growlers”, or could be sized down to fit wine or regular 12 ounce bottles. The slat design is a mix of form and function, as it allows the bottles to be seen while reinforcing the strength of the tote. While at $10, the pipe handle makes this project a bit pricey, it can easily be swapped out for a wood dowel or a heavy piece of rope.
Cost: $20
Time: 3 hour
Difficulty: Easy. The simple cuts and straightforward assembly makes this a great beginner project.
(1) 1 x 6 x 4′
(3) ½ x 2 x 4′
(1) ¾ inch Pipe with threaded ends
(2) ¾ inch Pipe Floor Flange
1 ¼ inch finish nails
Wood Glue
Wood Filler
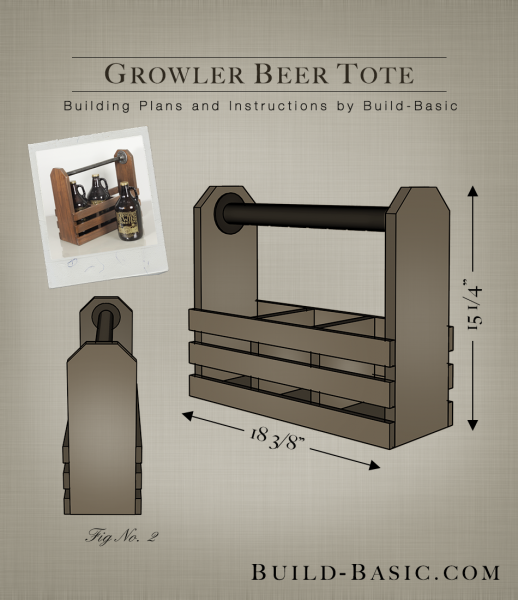
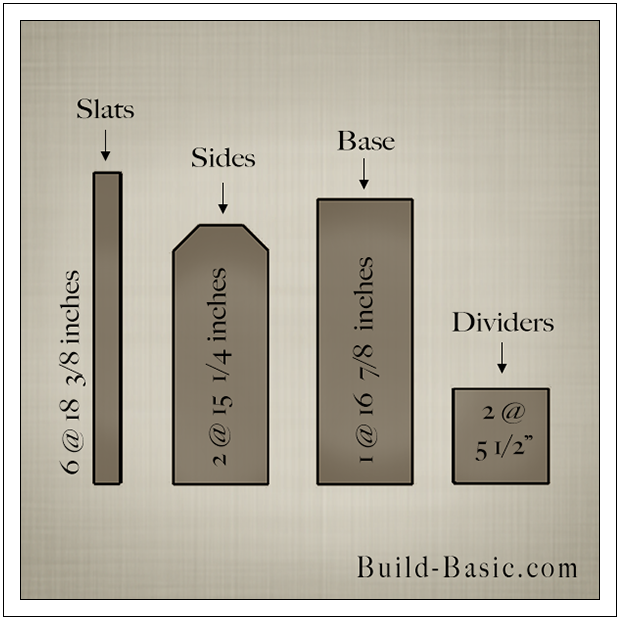
1 x 6 Base – 1 @ 16 7/8 inches
1 x 6 Sides – 2 @ 15 ¼ inches
1 x 6 Dividers – 2 @ 5 ½ inches
½ x 2 Slats – 6 @ 18 3/8 inches
Steps
1. Cut the Parts
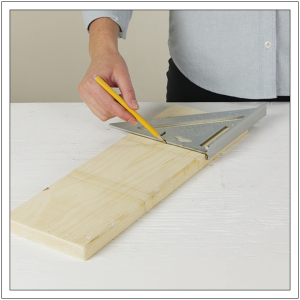
Using a miter saw and the cut list above, cut the parts to size. Clip the top corners of the Side pieces. Sand all the cut ends to remove burrs. If you’re substituting a wood dowel for the handle, cut that now as well.
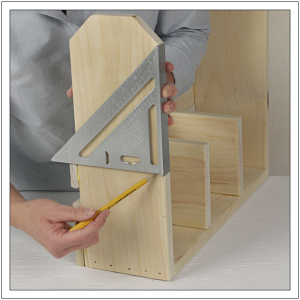
 2. Mark the Base
Using a square, mark lines on the Base piece that are 5 1/8 inches from each end. Mark additional lines 5 7/8 inches from each end. Repeat on the underside of the Base piece. The ¾ inch space between the lines is where each of the Dividers will set, evenly spaced 5 1/8 inch apart on the Base.
3. Attach the Dividers
Apply wood glue to the bottom edge of the Dividers and place them on the Base between the lines marked in step 2. Using the lines on the underside of the Base as a guide, shoot 1 ¼ inch finish nails through the Base and into the Dividers to hold them in place.
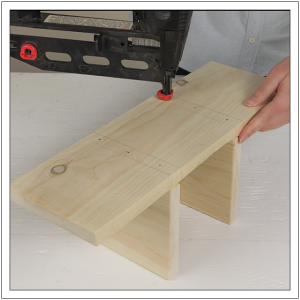
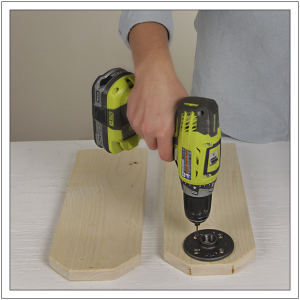
4. Position the Pipe Flanges
Mark the center of each Side piece near its top edge. Make an additional mark ¼ inch from the top edge of each piece. Place a flange on each Side, centered on the width of the piece, and positioned ¼ inch from its top edge. Using a drill, create shallow pilot holes in the center of each of the flanges’ mounting holes. This will allow quick and easy placement of the handle once the pieces are upright in the assembly.
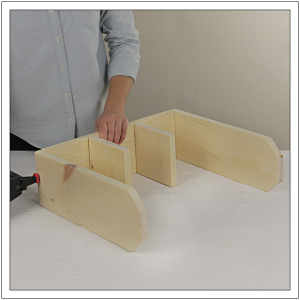
5. Attach the Sides
Apply wood glue to the ends of the Base. Place the Side pieces against the ends of the Base so that their bottom edges are flush. Nail through the Side pieces and into the ends of the Base to hold the Sides in place. I used about six 1 ¼ inch finish nails to securely hold the pieces together.
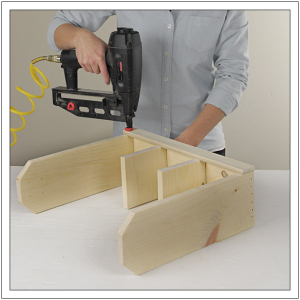
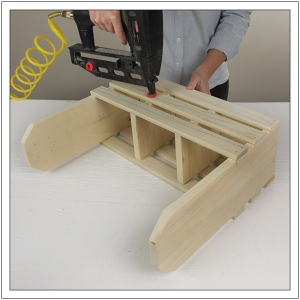
6. Secure the First Slat
Lay the assembly flat on its side. Apply wood glue along the edge of the base. Position the first Slat flush with the bottom edge of the Base. Nail through the Slat and into the edge of the Base. Send additional nails through the slat and into the Sides and Dividers. This will help reinforce the strength of the assembly.
7. Secure the Top and Middle Slats
Next, apply a dab of wood glue to the ends of the top Slat and place it on the assembly flush with the top edge of the Dividers. Nail through the Slat and into the edge of the Sides. If the Sides were tilting inward, this is the perfect chance to push them apart by making the ends of the Slat flush with the outer face of each Sides. Center the middle Slat between the top and bottom Slats, and then nail it in place.
8. Transfer the Slat Positions
Using a square, transfer the height of the Slats to the opposite side.
9. Attach the Remaining Slats
On the second side of the assembly, attach all three slats in the same way as described in steps 6-7, and using the marks created in step 8. Once all the slats are installed, ensure the Dividers are perpendicular to the base (not twisted or leaning). Nail through each slat and into the Dividers.
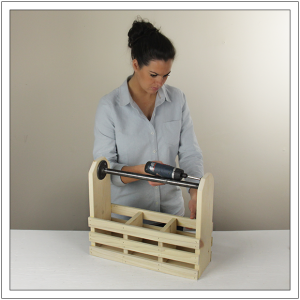
10. Add the Handle
Once all the pieces are assembled, fill the nail holes with wood filler, let dry, and then sand the assembly smooth. Thread the pipe into the flanges, and then place it between the Sides. Align the mounting holes in the flanges with the pilot holes in each Side, and then drive ¾ inch screws through the flanges and into the Sides. Tip: If the handle spins, apply a dab of Super Glue where the threads meet the flanges to hold it in place.
MORE BUILDING PLANS


Pingback: 19+ How to Make DIY Beer Caddy Ideas| Tips, Tricks, Tutorials
Jeff
I made two of these, and they are great. As previously mentioned the 6″ board needs to be at least 5 feet long, not 4 feet. The pipe and flange can be found at any Home Depot and cut to size and threaded there. $1.50 per thread. I suggest cutting the pipe to 16 3/8″.
Jeannette Seward
Berkshire Brewing is not too far from me. Great beer!