Add a touch of flair to this basic photo frame with a piece of burlap, or change the look completely with your favorite graphic fabric! The possibilities for customizing this frame are endless! And with all the parts coming together with just wood glue, the only difficulty is waiting for it to dry between steps!
TIP: Click the image above to reveal the free building plans. Click the tabs below to see the tools, materials and cut list.
Cost: $15
Time: 30 Minutes (plus drying time between steps)
Difficulty: Easy. Simple miter cuts and wood glue construction make this a great beginner project. Just be sure to have enough clamps on hand.
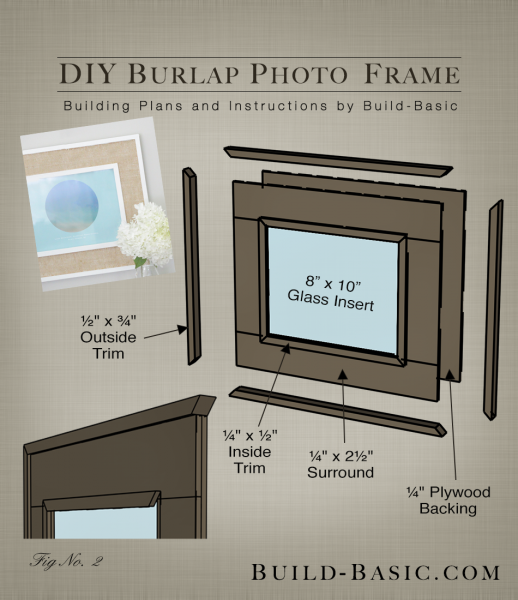
(1) 8″ x 10″ Glass
(1) ¼” x 2 ½” Lattice – Get 4 feet to create the frame’s Surround
(1) ½” x ¾” Trim – Get 6 feet to trim the outside edges of the frame
(1) ¼” x ½” Trim – Get 5 feet to trim the inside edges of the frame. If found mine at Michael’s Arts and Crafts
¼-inch Plywood – Get a 2′ x 2′ Project Panel to make the backing
(4) 1 inch Turnbuttons to hold the backing and glass in the frame. These can be found at Michael’s Arts and Crafts, but if you’re in a pinch like I was, you can use 1/4-inch Washers
(3) ½” wood screws to attach the Turnbuttons or washers
(1) Small Sawtooth Picture Hanger
Wood Glue
Clear-Drying Craft Glue. I used Mod Podge.
Burlap or Fabric
Wax Paper
Painter’s Tape
* Adding the 1/8-inch to the length and width of the frame gives the glass some wiggle room in case wood swells.
¼” x 2½” Surround (Top and Bottom) – 2 @ 8 1/8 inches
¼” x 2½” Surround (Sides) – 2 @ 15 1/8 inches
½” x ¾” Outside Trim (Top and Bottom) – 14 1/8 inches (Miter ends at opposing 45-degree angles)
½” x ¾” Outside Trim (Sides) – 16 1/8 inches (Miter ends at opposing 45-degree angles)
¼” x ½” Inside Trim (Top and Bottom) – 8 3/8 inches (Miter ends at opposing 45-degree angles)
¼” x ½” Inside Trim (Sides) – 10 3/8 inches Miter ends at opposing 45-degree angles)
¼” Plywood Backing – 1 @ 15 1/8 x 13 1/8 inches
Steps
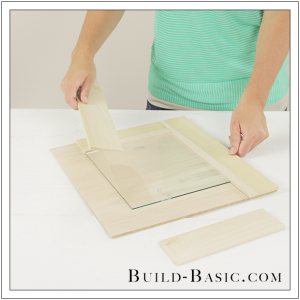
1. Size the Surround
Using the cut list above, cut the plywood Backing and Surround pieces to size. Lay the glass insert centered on the plywood Backing. Position the Surround pieces around the glass so that the top and bottom pieces run between the side pieces, flush with the ends. The glass should have a bit of wiggle room inside the center opening, in case the wood swells.
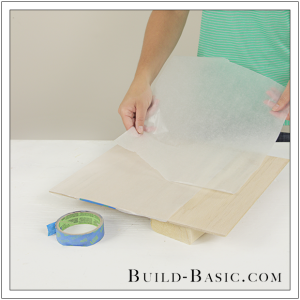
 2. Cover the Backing
Because we want to use the Backing as a gluing surface while we construct the frame, but don’t want the Backing to accidentally get glue to the frame, cover it with heavy-duty wax paper secured on the backside using painters tape.
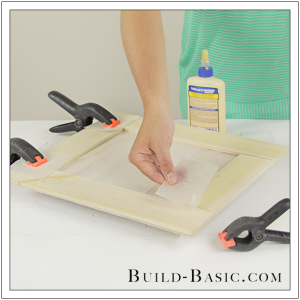
3. Glue the Surround
Apply wood glue to the ends of the shorter Surround pieces, and then place them between the longer Surround pieces. Place a piece of wax paper over each joint. Now place a spring clamp over each joint to hold the piece in place against the plywood Backing.
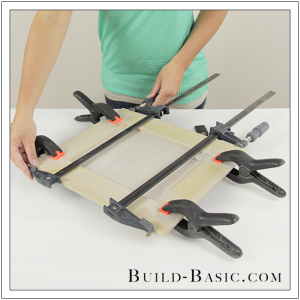
4. Clamp the Surround
Carefully position two bar clamps across the Surround to put pressure on the joints. The spring clamps should prevent the joints from “popping-up” and buckling under the pressure. Allow the glue to fully cure before removing the clamps.
5. Secure the Outside Trim
Using the cut list above, cut and miter the Outside Trim pieces to size. Because these are small strips, I prefer to use my
DIY Cutting Jig to prevent splitting. Apply wood glue to the outer edges of the Surround pieces, and to the ends of the Outside Trim pieces. With the Surround resting on the ¼ inch Backing, place the Trim against the edges of the Surround. Continue adjusting the Trim pieces until the mitered corners fit tightly.
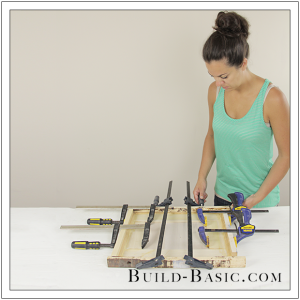
6. Clamp the Outside Trim
To strengthen the bond, place scrap pieces of wood around the frame and, using bar clamps, hold the Outside Trim in place until the glue fully cures.
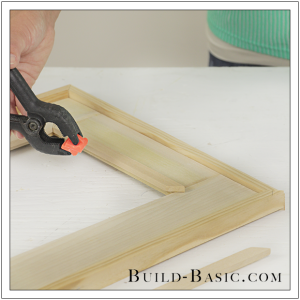
7. Add the Inside Trim
Using the cut list above, cut and miter the Inside Trim pieces to size. Because these are small strips, I prefer to use my
DIY Cutting Jig to prevent splitting. Position the Inside Trim pieces flat on the Surround. Once assembled, the inside edge of each trim piece should hang over the inside edge of the Surround by about 1/8-inch. This “lip” is where the glass will rest inside the frame. Apply wood glue to the backside and ends of each Trim piece, and then clamp it in place with small spring clamp. Allow the glue to fully cure before removing the clamps.
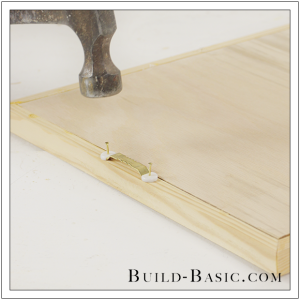
8. Attach the Hanger
On the backside of the frame, place the sawtooth hanger on the Outside Trim. Center the hanger on the width of the top piece of Trim. Using a hammer, tap the nails into the Trim to hold the Hanger securely in place.
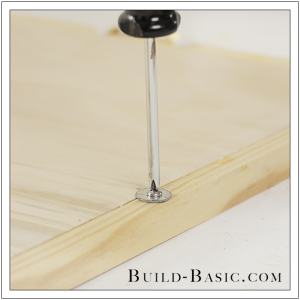
9. Secure the Backing
Using a drill/driver, drill a shallow pilot hole near the center of each remaining piece of Outside Trim. Using a screwdriver, tighten a ½-inch screw through a turnbutton (or washer, if you’re in a pinch like I was), and into the Trim.
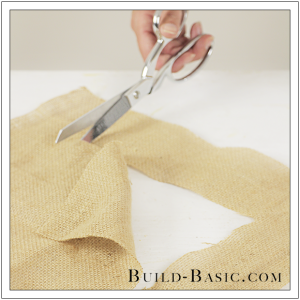
10. Size the Burlap
Using scissors, cut the burlap into a rectangle that fits onto the surround. Position the burlap in place, and then cut out a loose rectangle from its center.
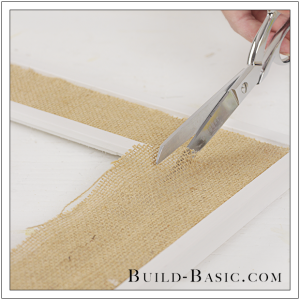
11. Attach the Burlap
Paint or stain the frame. Once the frame is dry, apply a coat of clear-drying glue, like Mod Podge, to the surface of the Surround between the Inside and Outside Trim. Place the burlap onto the Surround, pressing it in along the edges of the Trim. Using the Scissors, trim the burlap to fit along the Inside Trim, and then press fully into place. Allow the glue to dry flat before lifting the frame to insert the glass and artwork.
MORE BUILDING PLANS