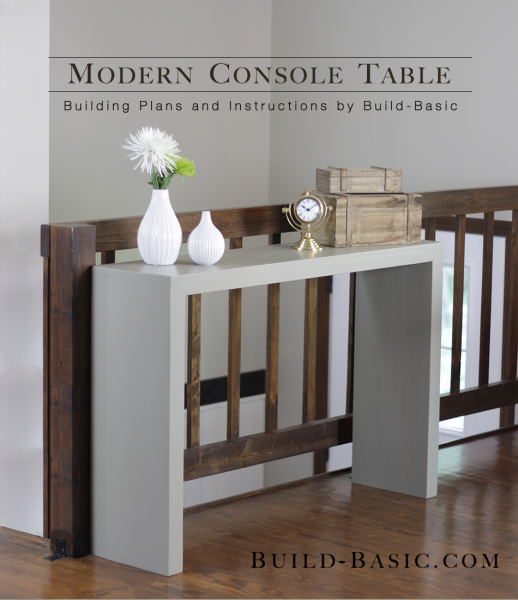
Simple lap construction and the layering of several boards make this paint-grade table appear to be one thick, expensive-looking piece. Not only is it easy to assemble, it’s sturdy and has a proportional thickness that keeps it from looking chintzy. The slim depth makes it the perfect addition to any entryway or hallway, and the width can be customized to fit any nook. Sure, you could (maybe) find a particleboard version of this design for under $100, but the real deal will easily cost over $350.
Paint Credit: Gettysburg Gray by Benjamin Moore.
Cost: $56
Time: 4 Hours
Difficulty: Easy. Straight cuts and lap construction make this assembly simple and sturdy.
(2) 1x12x6 Boards to make the table’s sides
(1) 1x12x8 Board to make the table’s top
(4) 1x2x6 Boards to pad the thickness of the sides and top
1¼ inch Wood Screws
2 inch Wood Screws
Wood Glue
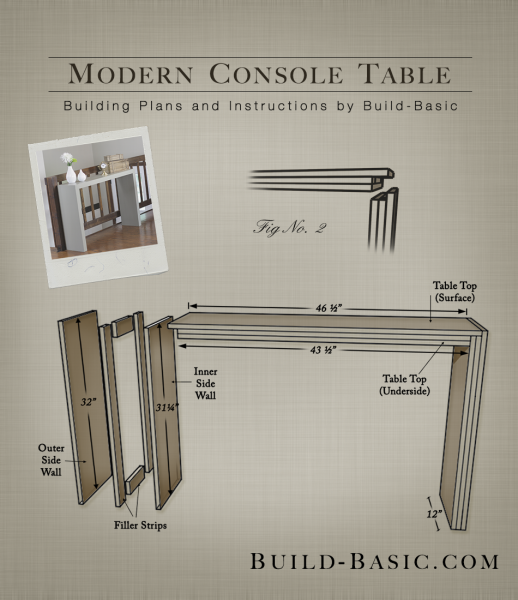
1×12 Tabletop (Surface) – 1 @ 46 ½ inches
1×12 Tabletop Surface (Underside) – 1 @ 43 ½ inches
1×12 Table Side Walls (Outer) – 2 @ 32 inches
1×12 Table Side Walls (Inner) – 2 @ 31 ¼ inches
1×2 Filler (Sides) – 4 @ 31 ¼ inches
1×2 Filler (Top) – 2 @ 43 ½ inches
1×2 Filler (Top and Sides) – 6 @ 9 inches
*Note: My home center laminated pine boards were an actual width of 12 inches (see drawing). If you’re using nominal 1×12 boards with an actual width of 11 ¼-inches, then cut the fillers to 8 ¼-inches.
Steps
1. Cut and Layout the Pieces
Start by cutting all the 1×12 pieces to size using a circular saw, and all the 1×2 pieces to size using a miter saw. Lay the inner side walls flat on the work surface. Position the 1×2 filler strips on the walls flush with their edges. The short filler strips should fit between the longer filler strips as shown.
 2. Secure the Filler Strips
Drill shallow pilot holes through each filler strip and into the wall. One at a time, pick up each strip and lay a bead of wood glue between the strip and the wall. Holding each filler strip in place (they like to slip around on the glue), secure the strips in place using 1¼ inch wood screws. Be sure the heads of the screws sink just below the surface of the filler strips, but not so deep that they punch through the finish face of the side walls. Wipe off any wood glue oozing along the outer edge of the wall using a damp rag.
 3. Assemble the Side Walls
Lay a bead of wood glue on each filler strip. Place the outer side walls on the strips so that their bottom edge is flush with the strips and the top edge sits down 1 ½ inches, as shown. Clamp the outer side walls in place and flip the assembled walls. Using a drill/driver, drill pilot holes through each inner side wall and filler strips, and into the outer side walls. Be very careful not to drive the holes through the outer side walls. Now secure the outer side walls with 2 inch wood screws.
 4. Attach the Tabletop Filler Strips
Position the remaining filler strips on the shorter tabletop board. Align the filler strips flush with the edges of the board. Secure the filler strips in the same way described in step 2.
 5. Secure the Tabletop
Apply a bead of wood glue to the filler strips and lay the tabletop in place. Use a scrap block the center the tabletop with equal ¾ inch overhangs on each end. Clamp and flip the assembled pieces. Secure the tabletop with screws as described in step 3.
 6. Position the Tabletop and Sides
Stand the sides and tabletop on their back edge. Position the tabletop above the outer side wall as shown.
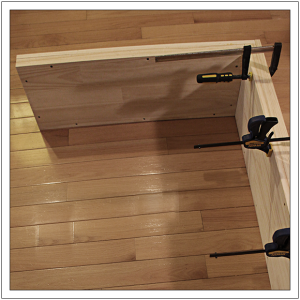
 7. Assemble the Tabletop and Sides
Using a drill/driver, create three angled pilot holes through the inner side walls and into the underside of the tabletop. Drive two additional pilot holes through the outer side wall and into the tabletop’s filler strip. Separate the tabletop and sides and apply wood glue between the pieces. Drive 2 inch screws into each of the pilot holes. When sanding the assembly, take the time to sand the front edge and the end grain of the tabletop to create the illusion of a single thick board.

MORE BUILDING PLANS
Pssst: Check out Build Basic on Weekend Bloggy Reading over at Serenity Now !
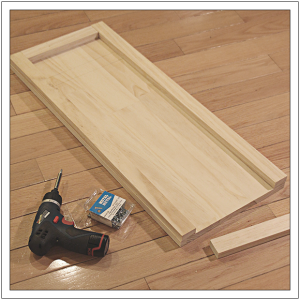
 2. Secure the Filler Strips
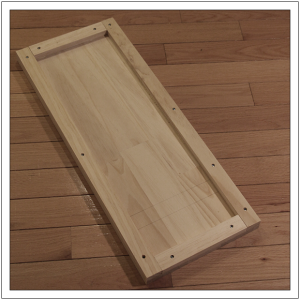
 3. Assemble the Side Walls
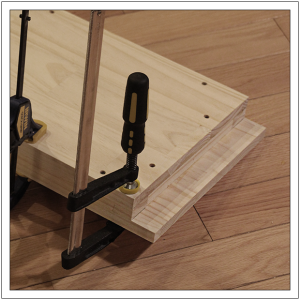
 4. Attach the Tabletop Filler Strips
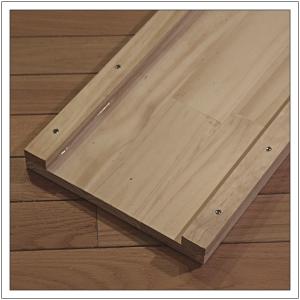
 5. Secure the Tabletop
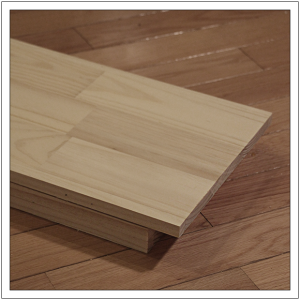
 6. Position the Tabletop and Sides
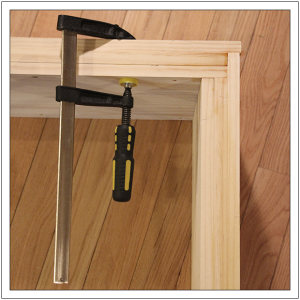
 7. Assemble the Tabletop and Sides






Lindsey
I would love to follow up to Cormac’s question. Did you use a filler on the edges prior to painting? We are looking to make 2 of these as end tables.
Siobhan
I am wondering about the railing behind the console table–do you have any more pictures/information about how you built it? I can see basically how it was done in the picture, but I am wondering if there is more support to the railing that is not shown in this view.
Thanks!
Jenn Post author
Hi Siobhan,
I’m out of the office for the holiday weekend, but if you send me an email next week, I’m attach a few more photos of the details and the mounting brackets the old homeowners used when the railing was built. Talk Soon! –Jenn
Cormac O Bric
Im planing on making this piece and I was just wondering can you supply any information about the finish of the piece after the wood working is done?
I very much like the finished of the piece in the initial photo and am wondering what paints etc were used?
Thanks.
Jenn Post author
Hi Cormac,
Absolutely! The paint is a Benjamin Moore color called Gettysburg Gray. If you don’t have a local Benjamin Moore store, you can always tell the homecenter to mix this color into any paint of your choosing. Also, we’d love for you to share photos of your build with us once it’s complete (email to: jenn@build-basic.com) for a chance to be featured! Happy building! –Jenn
Cormac O Bric
Thanks for the speedy reply.
I like how the piece has a monolithic appearance in that the legs and top appear as one piece, not 3 sheets.
I was wondering if you used a light wood filler to achieve this or just sand and paint?
I’m guessing a thick oil based undercoat and top coat is best?
Thanks again.
Mac
Measurements are off in several areas. The table top is about 1.5 inches too long. The side walls (facing) are too short by 3/4 inch. Should be 32 3/4. The 9 inch fillers are too long by almost an inch. I appreciate people putting projects up here, but this one is way off the mark.
Jenn Post author
Hi Mac,
Thank you for taking time to reach out with your concerns. The measurements above are designed to create a faux rabbet joint between the top and sides of the console. We felt this type of assembly added strength to the construction. If you click on the main image above, it will rotate to the building plans, which more clearly illustrate the way the table was designed. Per your comment on the 9-inch filler strips; I used pine panels from the home center which were an actual width of 12-inches (noted in the drawing), making the filler strips sandwiched between two 1×2’s, a length of 9-inches. I’ve now noted this in the cut list as well to avoid any further confusion. Hope this helps. Please feel free to reach out with any further questions!
Mac
Thanks Jenn! I built the table exactly the way you instructed. I measured and remeasured a dozen times to make sure I wasn’t crazy. I could definitely be missing something. I am done with the table and I love it. I build it the exact way you instructed with the faux rabbet joint between the top and bottom. The only alteration I had to make was the facing wall panels had to be 3/4 inch longer (32 and 3/4) and the facing table top had to be shorter by about 1.5 inches.
I think it all comes down to the type of wood you buy. At home depot, none of the wood is actually the dimensions listed. I double checked this last night when i was there for the 3rd time :). All the wood, including the pine is slightly shorter than the listed measurements. For example, a 1x2xX is really 3/4×1.5xX. This actually clears a lot up for me. Your measurements are correct.
Seeing a lot of people use Home Depot, I would make a noticeable *NOTE* in the instructions to either adjust the measurements or go to a place that sells wood in the actual dimensions listed.
Regardless, I adjusted and it looks great. I love it. I also build a base on it with a hinged top. its for shoe storage.
Thanks!
Jenn Post author
Mac,
I’m so glad the table turned out well! I’ve been meaning to write a post on the “nominal vs. actual” size of lumber. It can be very tricky, as lumber is rarely the size it is says in the store. Also, we often post reader projects,—if you’d ever like to send us photos for consideration, the email address is jenn@build-basic.com! Take Care!
Anonymous
its a beautiful piece of furniture i intend to have in my house.