Photo Credit: Ashley Largesse Photography
Most projects here at Build Basic are brainstormed on a napkin or the back of a receipt, and then move quickly into the sketch, prep, and building stages. But when The Home Depot invited me to participate in a Lumber DIY Challenge, I found myself with a case of builder block–a close kin to writer’s block, which I experienced waaay too many times throughout my years in the Magazine industry. Somehow I found myself daydreaming of upcoming summer cookouts (i.e. reasons to procrastinate), which led me to thinking about how our barbecues typically turn into a “tournament of backyard games” among friends and family.
So, I thought, I already built a rustic DIY Baggo Game Set (which we LOVE), and just about every place I stop has a plan for Ladder Golf. So what game could we add to our “outdoor offerings” that would feel fresh and different? Enter my childhood love for Connect Four, and a strong urge to build a giant-sized version, complete it with holes, discs, and slots that empty when the game is over.
Which is all to say, my builder’s block was cured, the four-in-a-row game turned out waaay better than I thought it would, and we have a new reigning backyard favorite that’s perfect for all ages. Here’s how to build your own…
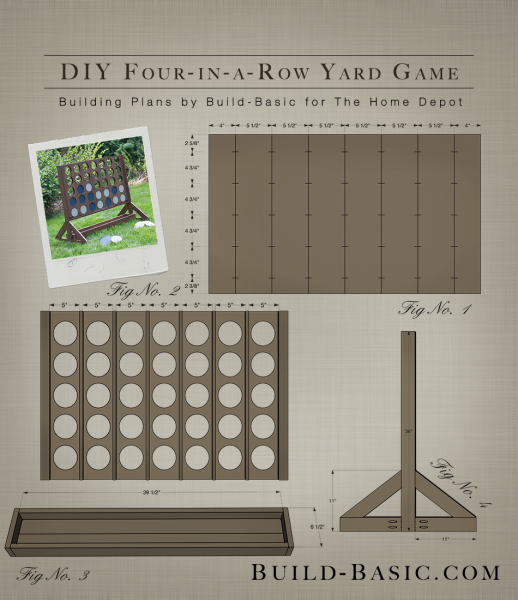
TIP: Click the image above to reveal the free building plans. Click the tabs below to see the tools, materials and cut list.
NOTE: This tutorial may contain affiliate links. To see our full disclosure policy, click HERE
Cost: About $60
Time: 4 hours
Difficulty: Moderate. While the assembly is easy, drilling all the holes takes time and patience.
Note: This list may contain affiliate links
(2) ¼” x 2′ x 4′ Plywood Project Panels
(1) ½” x 2′ x 4′ Plywood Project Panel
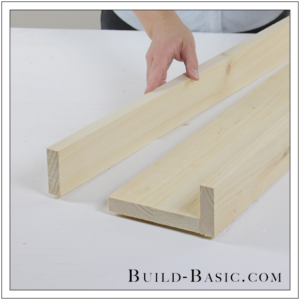
(2) 1 x 3 x 6′ Boards to make the Legs and Tray
(6) ½” x ½” x 3′ Square Dowels
(2) ½” x 2 x 3′ Hobby Boards
1¼” inch Kreg Jig Screws
5/8-inch finish nails
1¼” Finish Nails
Center Panel
¼-inch Plywood Panels – 2 @ 41-by-24-inches
½” x 2 Boards – 2 @ 24 inches
½” x ½” Square Dowel Dividers – 6 @ 24 inches
1 x 2 Disc Holder – 1 @ 41 inches
Tray
1 x 3 Floor Boards – 2 @ 39½ inches
1 x 3 Sides – 2 @ 39½ inches
1 x 3 Ends – 2 @ 6½ inches
Legs
1 x 3 Vertical Stands – 2 @ 36 inches
1 x 3 Horizontal Boards – 4 @ 11 inches
1 x 3 Angled Boards – 4 @ Cut and Miter to Fit
Game Pieces
½” Plywood Discs – 35 @ 5-inch circles (using a 5-inch hole saw)
Steps
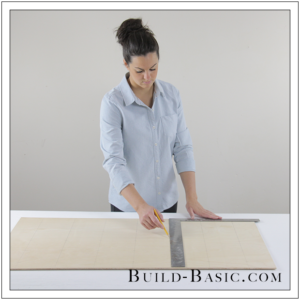
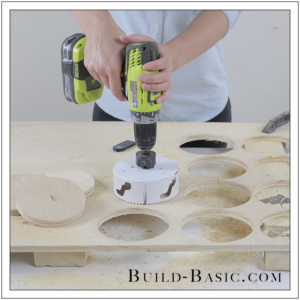
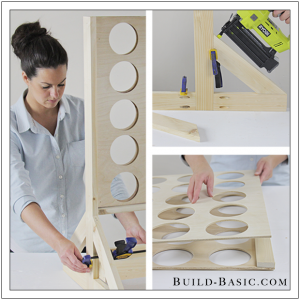
1. Layout the Holes
Using the cut list above, cut the plywood pieces to size. (Tip: Use my easy
DIY Plywood Cutting Tutorial). Sandwich the two pieces of ¼-inch plywood together. Place the plywood pieces on support blocks. Clamp the plywood and support blocks firmly to the work surface. Mark a grid on the plywood to designate the center of each circular cutout using my
Building Plans HERE.

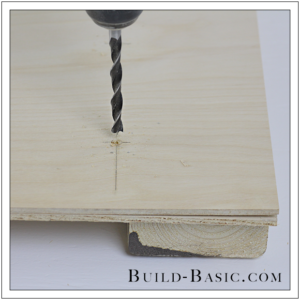
2. Create the Pilot Holes
Because hole saws can wander a bit until the drill bit bites into the wood, drill pilot holes at each crosshair. Choose a drill bit with a sharp point, like a brad point drill bit.
3. Cut the Holes and Discs
Using a drill/driver fitted with a 4-inch hole saw, drill the holes. To see my tips on how to use this tool, see my tutorial
HERE. Tip: Allow time between cuts for the drill motor to cool, and keep a second battery charging, as this part of the process can run through a battery’s power quickly.
Lastly, cut the discs from a separate piece of ½-inch plywood using a 5-inch hole saw attachment. The interior cut out of this size hole saw is just under 5 inches (because you lose the thickness of the blade), which allows the discs to pass freely through the 5 inch spacing between dowels later. Likewise, the thickness of ½-inch allows the discs to “stack” on top of one another inside the slot.
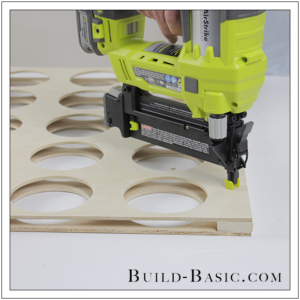
4. Join the Panels
Place the panels back-to-back. Apply glue to two ½” x 2 boards. Position the boards between the plywood panels flush with their side edges. Clamp the parts together. Nail through the plywood and into each board from both sides using 5/8-inch nails to join the panels.
5. Position the Dowels
To create the slots for the discs to fall into, slide ½” x ½” square dowels between the plywood panels, centered between the holes, spaced 5 inches apart. See the Building Plans above for reference. Nail through the plywood panels and into the dowels from both sides to hold them in place.
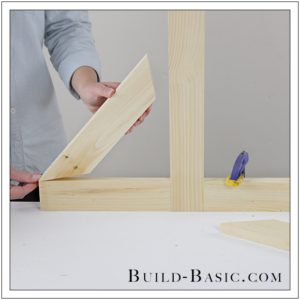
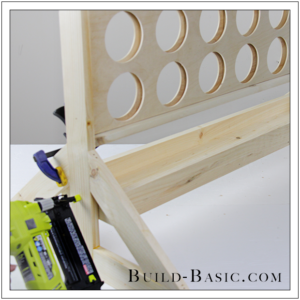
6. Build the Legs
Using a pocket hole jig, drill pocket holes in one end of each horizontal 1 x 3. Apply wood glue to the end of the board. Clamp the board against the edge of the 36-inch Stand, flush with its bottom edge. Screw through the pilot holes using 1¼-inch pocket hole screws. Attach a second board on the opposite side of the Stand. Repeat to create the second leg. Hold a 1 x 3 angled from the tip of the horizontal piece to a height of 11 inches on the Stand. Mark the angle at each end, and then miter the pieces to size. Apply glue to the mitered ends, and then toenail them into place using 1¼-inch nails. See the
Building Plans for reference.
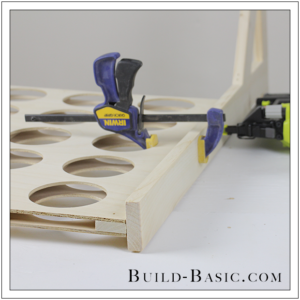
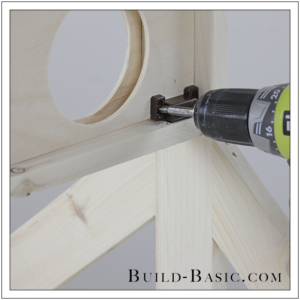
7. Secure the Legs
Apply wood glue to the sides of the assembled plywood panels. Position the legs on edge against the panels. Make sure the pocket holes on the legs are facing inward. Raise the plywood with a scrap 1x block underneath to center it on the width of the leg. Nail through the leg and into the ½” x 2 board with 1¼-inch nails.
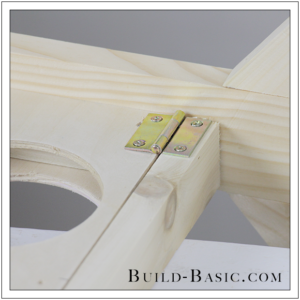
8. Add a Board to Catch the Discs
To hold the discs in the frame during play, covered the gap at the base of the plywood panels with a hinged 1 x 2. Position and secure the hinges along the outer edges of the plywood panel so that the screws sink firmly into the ½” x 2 boards as well as the edge of the 1 x 2.
9. Add a Magnetic Catch
With the hinged 1 x 2 in the closed position, flip the assembly over. Attach magnetic catches near the ends of the 1 x 2 and plywood panels, as shown.
10. Build the Tray
To assemble the tray’s floor, first drill pocket holes along the adjoining edges of the 1 x 3 floor boards. Apply glue between the boards, and then use 1¼-inch pocket-hole screws to secure them in place. Using a nail gun, shoot 1¼-inch nails through the 1 x 3 tray sides and into the outer edges of the floor boards. Cap the ends of the tray with the 6½-inch-long 1 x 3’s. Nail through the boards, and into the ends of the side and floor boards using 1¼ inch nails.
UPDATE: Some reader have said this magnetic catch doesn’t quite hold the weight of their discs. A screen door hook or shutter magnet is a good alternative (Thank you to Steve for the suggestion!).
11. Secure the Tray
Lastly; mark a height of 5 inches on the inside of each leg. Raise the tray until its top edge reaches the line, and then clamp it in place. Repeat on the opposite side. Nail through the legs and into the tray to hold it in place. Now grab the game pieces and an opponent and battle to get four discs in a row horizontally, vertically, or on a diagonal. When the game is complete, flip open the hinged 1 x 3 to release to discs and play again!
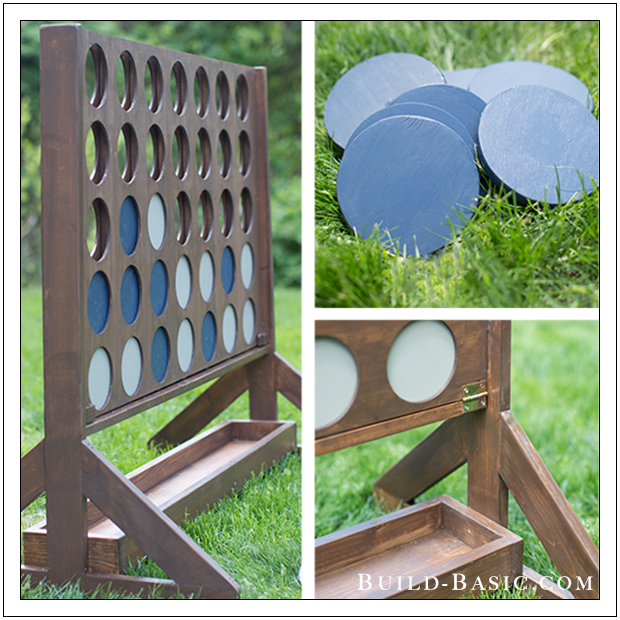
Photo Credit: Ashley Largesse Photography
WANT TO BUILD THIS PROJECT?
CHECK OUT MORE FUN PROJECTS FROM
THE HOME DEPOT LUMBER DIY CHALLENGE

Posted by Jenn & filed under General. This post has 35 comments.


woodbilder steve
Congratulations on your efforts at presenting the project and fine documentation. However as a 50-year cabinetmaker and woodworker, I respectfully suggest that a third drawing showing the circular cutouts dimensioned to the CENTER LINES, as indicated by the questions above, is needed. Also readers need to know that a 4″ and 5″ pair of circle cutters will retail for about $60.
Melissa
Jennifer, I’m in the middle of making this project. After cutting the 4 ft X 2 ft grid with 4 in holes, I realized that the dimensions don’t add up. The discs are 5 in diameter. I would need at least 25 in vertical to stack the discs. The 4 X 2 grid only gives me 24 inches. Are the dimensions wrong?
Jenn Post author
Hi Melissa,
I’m so excited to hear you’re building the project!! To answer your question, the 5-inch discs, once cut, are really only about 4.75-inches in diameter, so they should stack fine inside the 24″ height of the panel. Hope this helps!! -Jenn
Melissa
Thanks for the quick response. Now, I understand.
Pingback: Reader Project – Four-in-a-Row Yard Game ‹ Build Basic
Tina
This is awesome! I am making one of these for our school carnival. But I’m a little confused at how big to make the discs. It says to use 5″ circles, but the board is only 24″ tall and there are five holes. Am I missing something? Won’t the discs end up not matching and then be sticking up from the top if all the holes are filled with discs? Thanks for any info you can give me.
Jenn Post author
Hi Tina,
Sorry for taking so long to respond! A few readers have asked this question, which tells me I I probably didn’t do a very good job explaining….SORRY! Okay, so, when you cut the discs, they actually only come out to a diameter of 4 3/4-inches, and do fit correctly inside the height of the panel. Again, sorry for the confusion! I hope this helps! -Jenn
Cody
I understand it will vary but can you provide a general idea on the cost to build?
Pingback: Build a DIY Twin Bed ‹ Build Basic